Watch our cool video tutorial below!
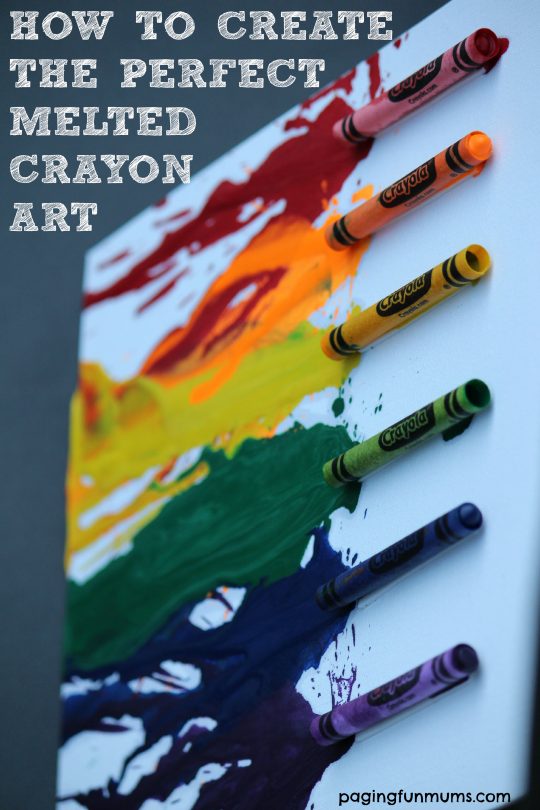
Here’s all the info you need on How to Create The Perfect Melted Crayon Art!
CAUTION: This activity involves melting Crayola Crayons. Melted crayon wax may be hot to the touch. Adult supervision is required. Not recommended for children younger than 8 years old.
So here are my tips as well as some video to help you create a wonderful Crayon keepsake first go!
Go with a brand of Crayon you trust! Why not go that one step further and buy their Crayon Melting set with all the instructions?? Yes, these kits are available to buy…and from Crayola no less.. the original crayon brand itself!! These kits are designed to help you create amazing melted crayon masterpieces with NO mess!!
Here’s what came in our Crayola Meltdown kit –
- 2 white canvases
- 1 black canvas
- 24 Crayons
- Double sided tape
- paint brush
- 6 washable paint tubs with pearl FX (awesome paints)

How we created our art (and learnt some tips along the way) –
Firstly, you’ll need to set up near a power outlet…and you’ll also need a hairdryer!
We followed the directions included to made a convenient canvas easel/holder using the product box itself! This safely caught all the hot drips that ran from the bottom of the artwork. Just to be safe we also covered our work surface with some cardboard.
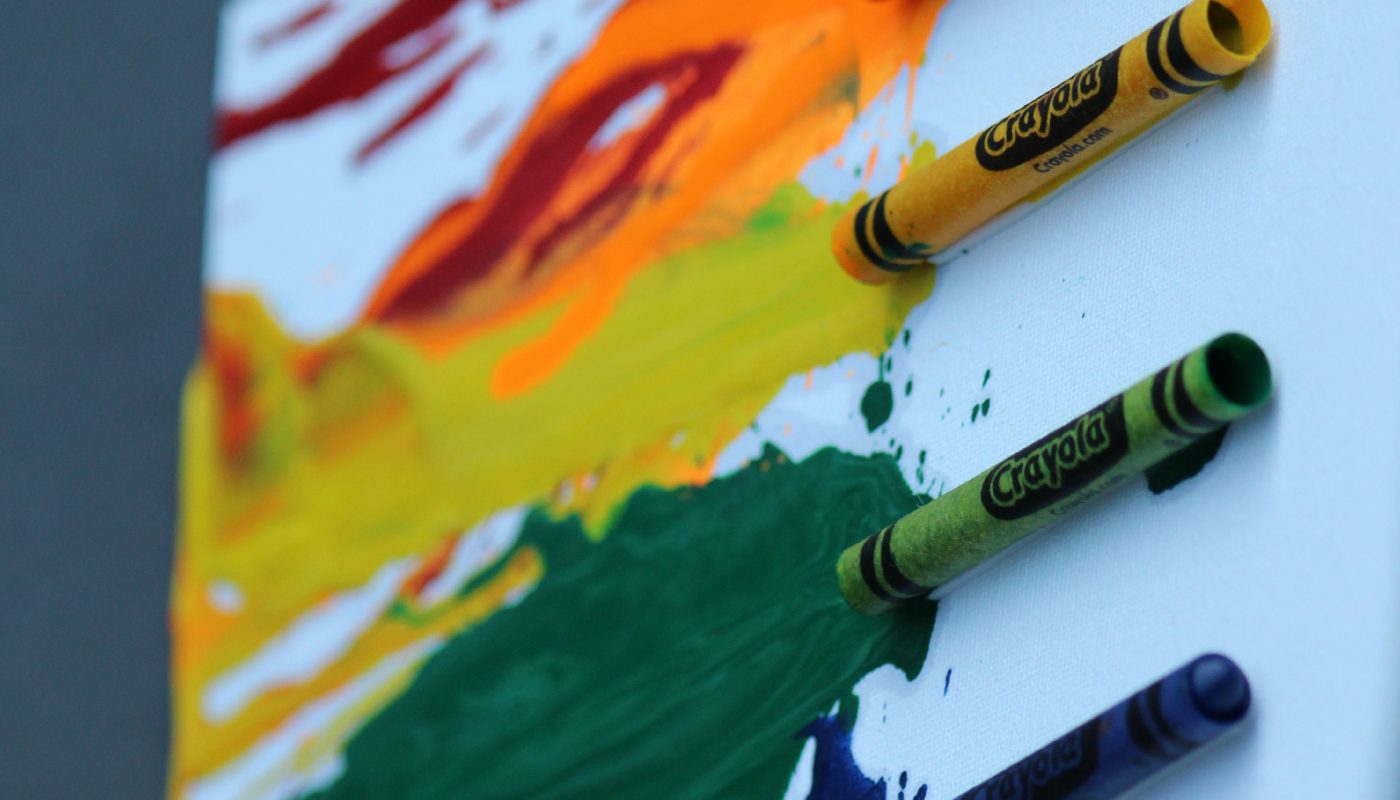
Once we were all set up we used the double sided tape to adhere the crayons – some with their wrappers and some unwrapped. We chose to create a few different designs but our favourite was this simple Crayola Crayon box dripping down the canvas.

You can watch just how easily we made this by watching this quick video.
Tips –
- It works best if you try to melt them downwards – start the heat from he top of the crayon and slowly work downwards
- Let the wax cool and dry between layers – this allows you to create multiple 3D layers and designs as the melted crayons set on top of each previous layer.
- DO NOT TOUCH the hot wax…trust me it’s hot and will burn your fingers – leave the artwork to fully cool and ‘set’ before you move it.
- Don’t be tempted to get too crazy with the blower speed – too much speed = hot splatter!
- Create cool effects by melting the crayons in a variety of directions.
- Add glitter or even photographs while the wax is still warm – these will then be ‘frozen’ in place by the wax.
- Break the crayons in smaller pieces to create different designs like this Ice cream Cone!

We’ve all seen the Pinterest photos of awesome ideas using melted crayons…including some fails amongst the successes! We have a great Pinterest Board dedicated to just that![pin_board url=http://www.pinterest.com/pagingfunmums/melted-crayon-art/]

You can head to the highlighted link to find out more about the Crayola Meltdown Art Set! We think they would make the perfect Christmas gift! Head to Kmart or Spotlight to pick up a set.
Jenni & Louise xx
**We (Louise & Jenni) do receive products free for review from time to time, we will only promote products that we like and enjoy using ourselves and feel that our fellow Fun Mums might enjoy the product too. We will always give our own honest opinion of the product.
These crayons look like a new way of painting for my grandkids(5) & would make great christmas presents
Hi Jenny, they are so easy to make too! Great gift idea for Christmas :).
Louise x
So much fun.
I hope that my entry is not eliminated due to my not being on Instagram.
My daughter would love these another awesome product from Crayola
Y not for Asian countries..
Can you tell me how you did the Little Mermaid melted crayon art. I really like and I think it would be a great gift to give my sister for a graduation present.