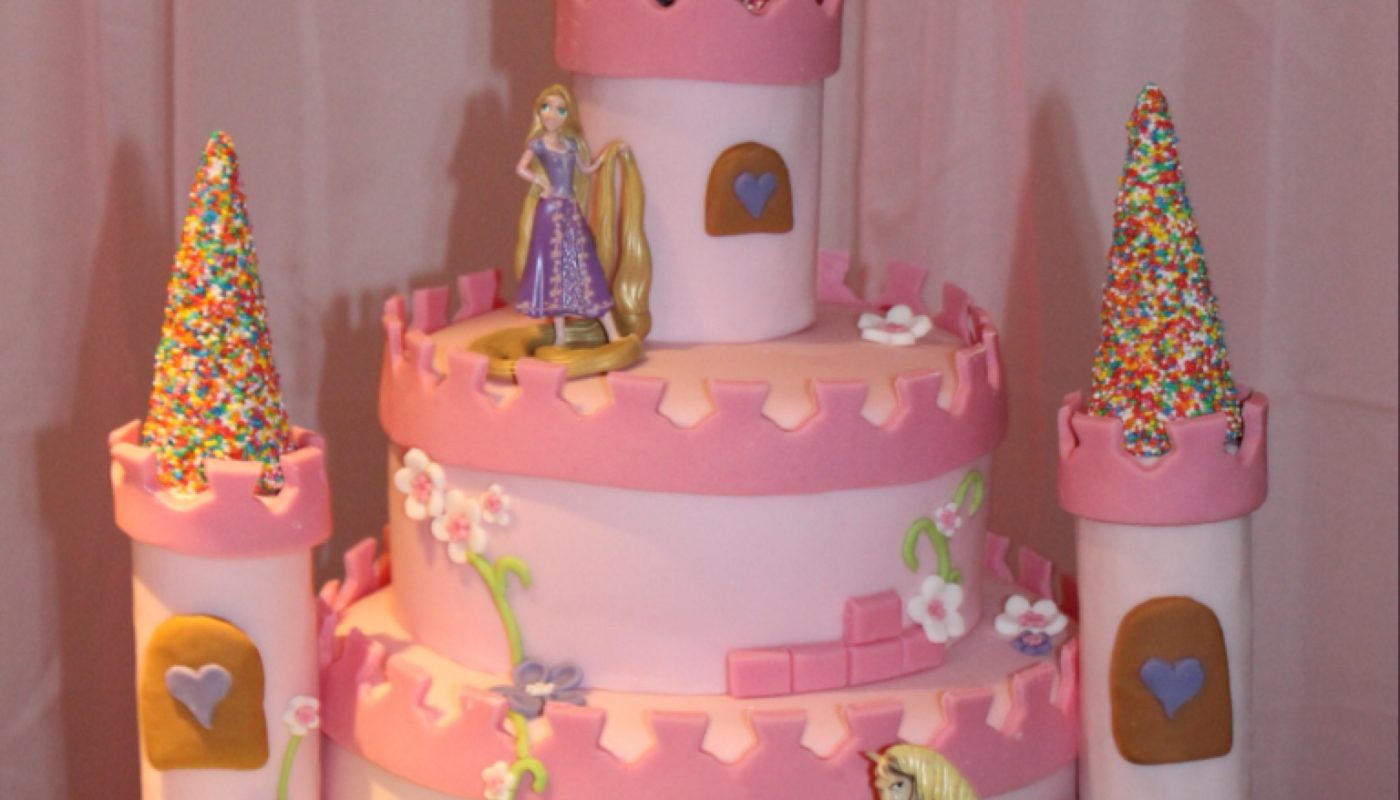
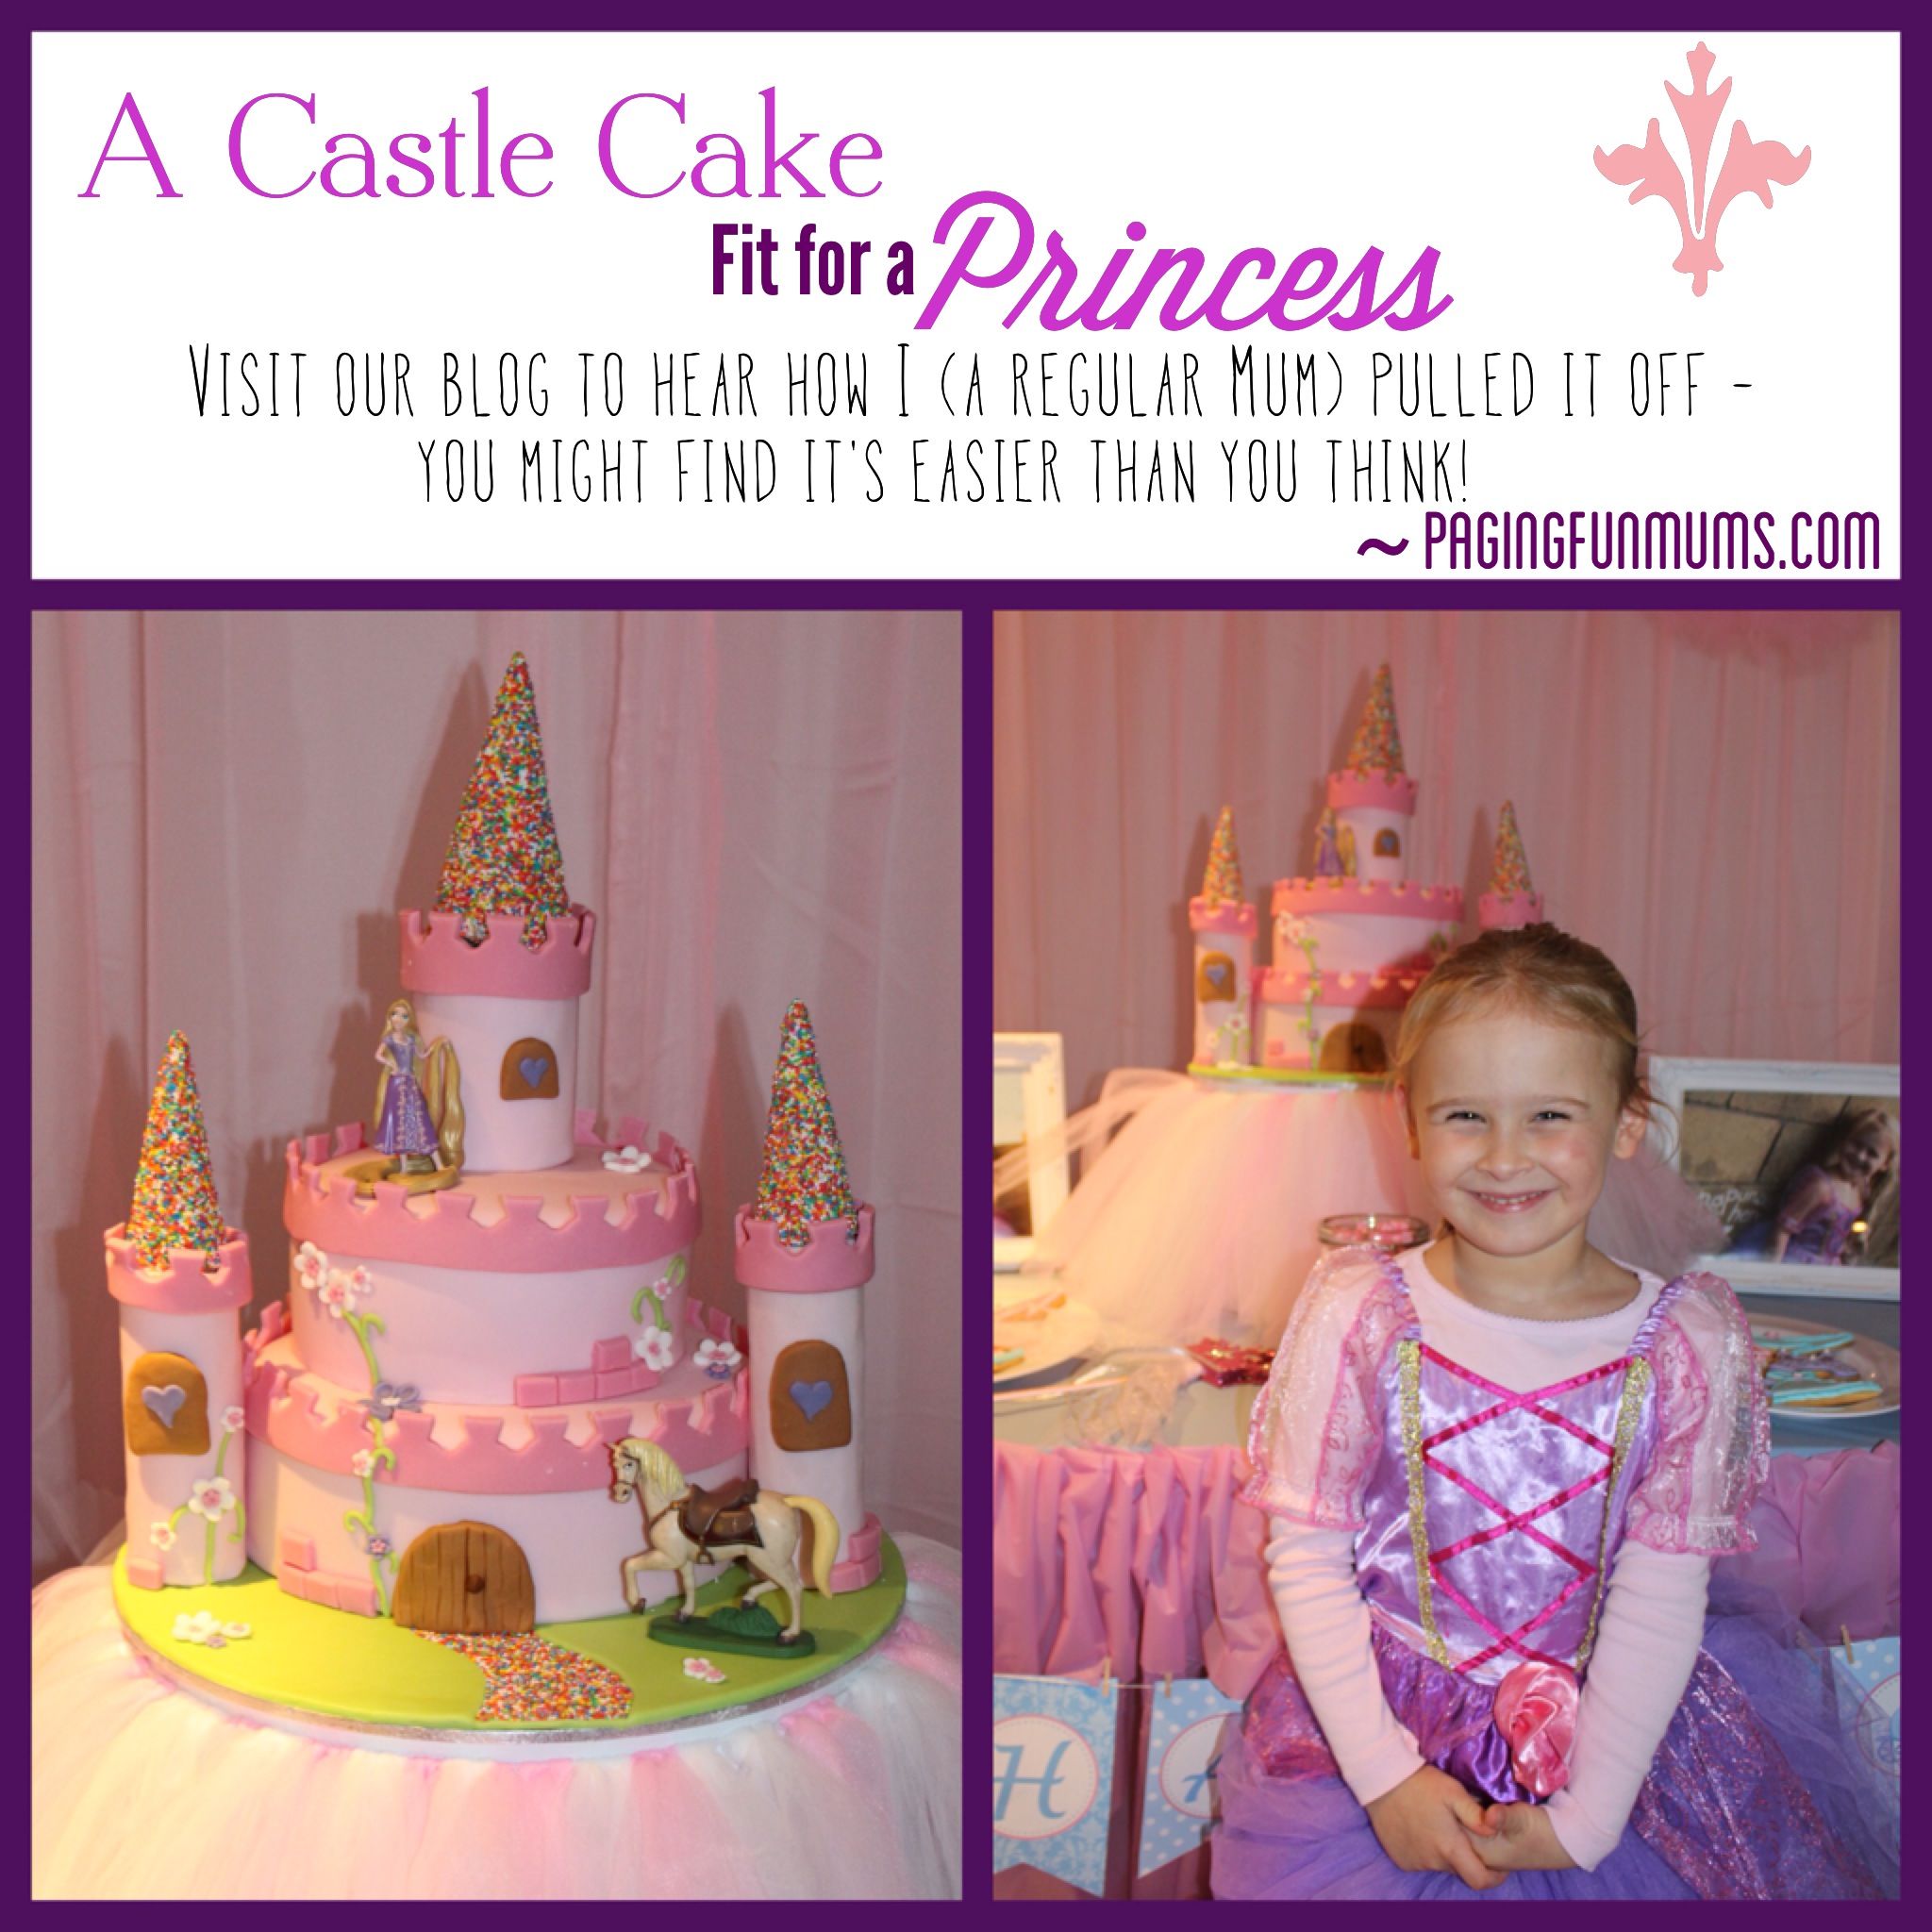
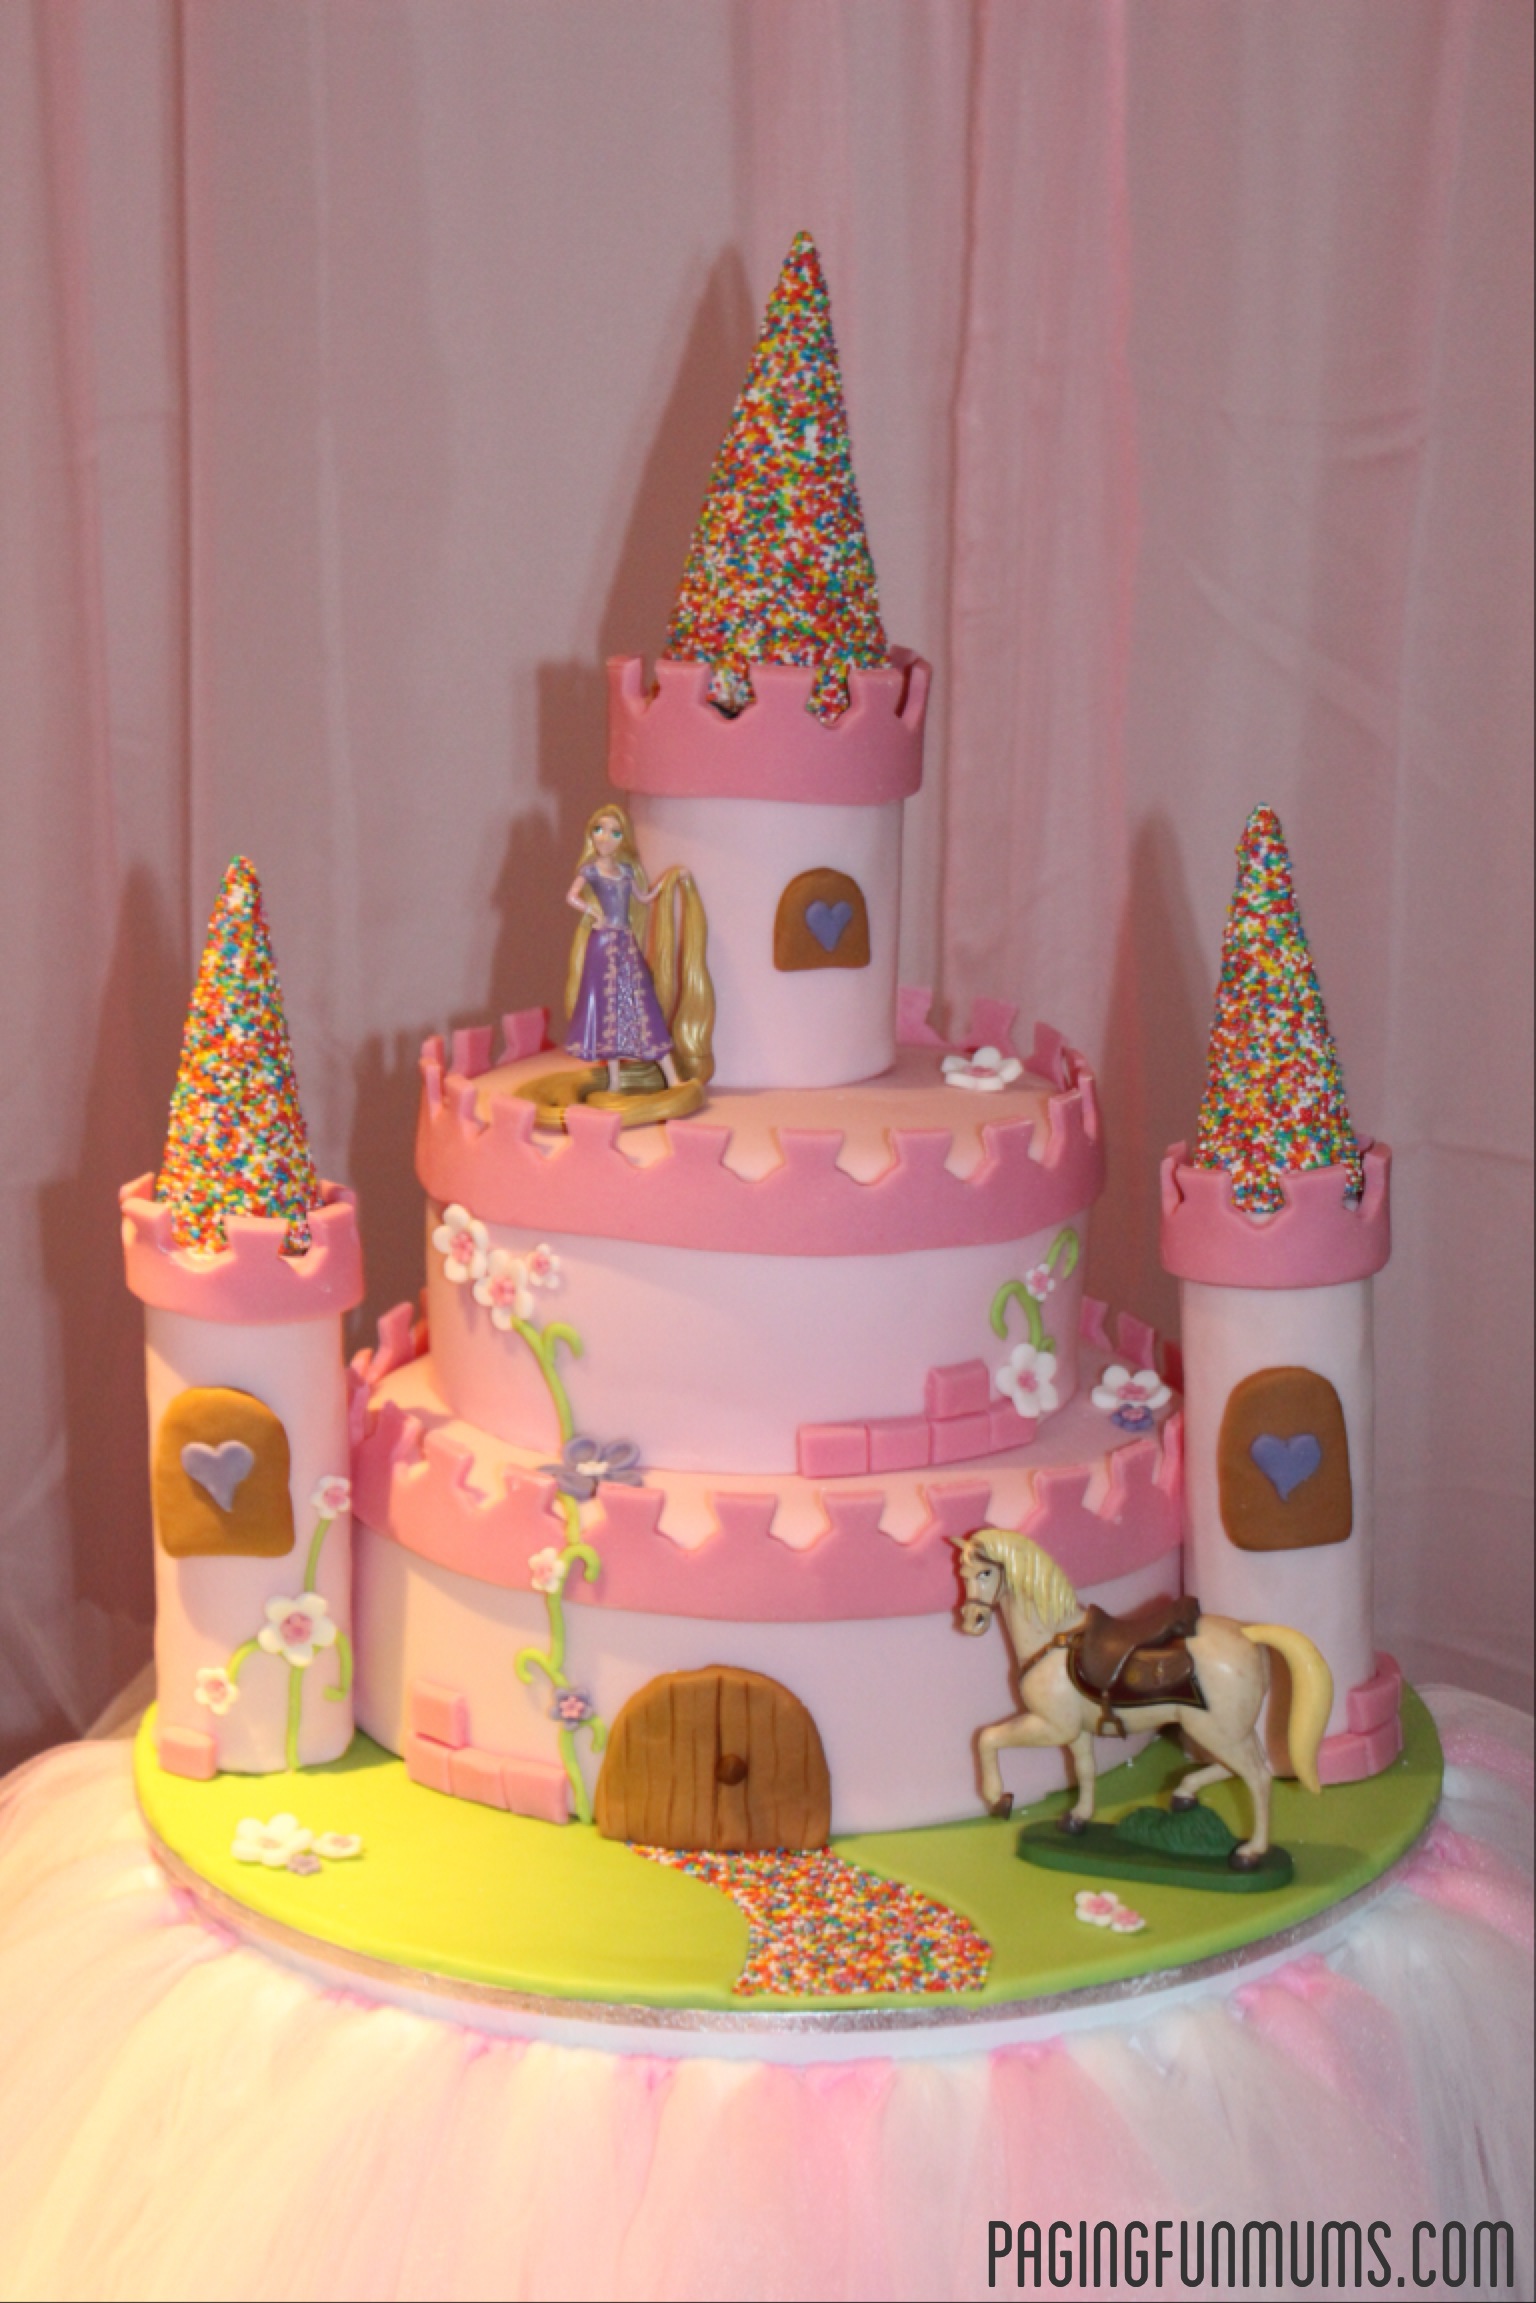
The Princess Castle Cake…made by me – a regular Mum!
So when I asked Miss M what type of cake she would like for her upcoming Birthday I shouldn’t have been surprised when she answered “A huge castle…with Princess Rapunzle on it”…Oh my! Time to hit Google, Pinterest AND ebay!! Lol
In the end I thought I should just break down the cake into areas I knew I ‘could’ do and had done in the past – I love working with fondant and just don’t trust my hands with a piping bag so that part was clear – I also know I can cover round cakes fairly easily but have struggled with square in the past.
So I sat down and sketched the cake design using those two base components.
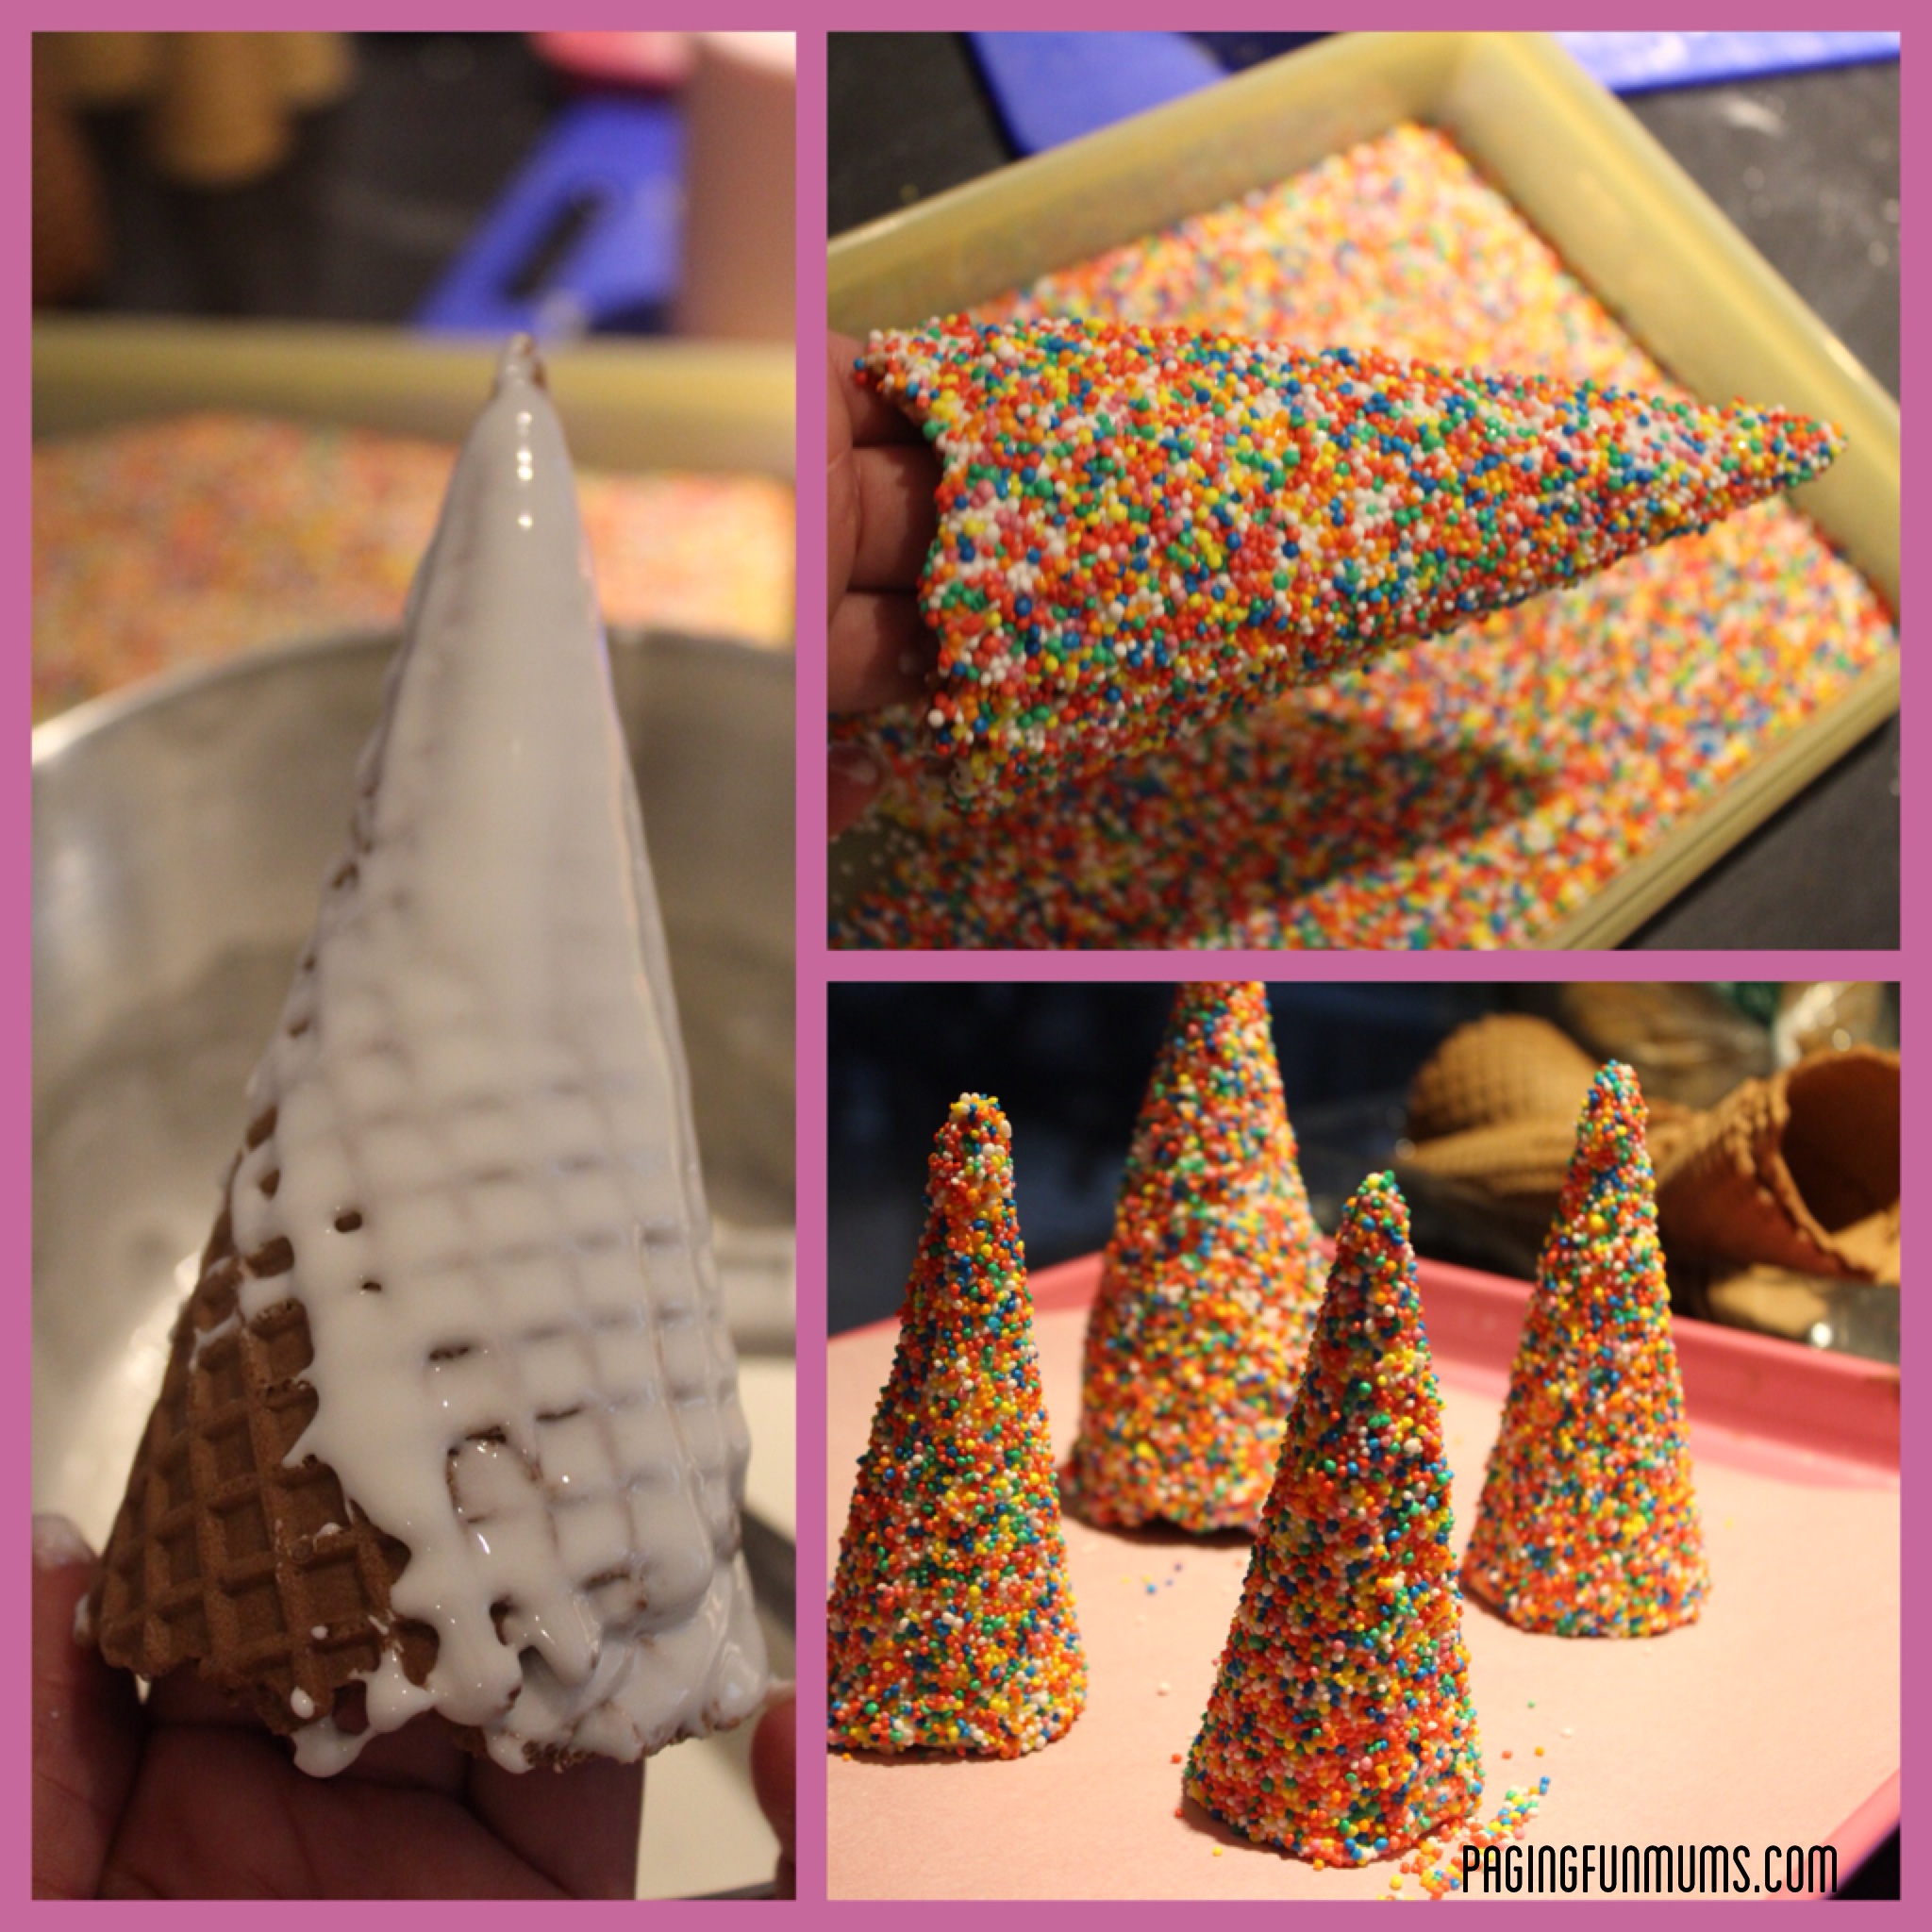
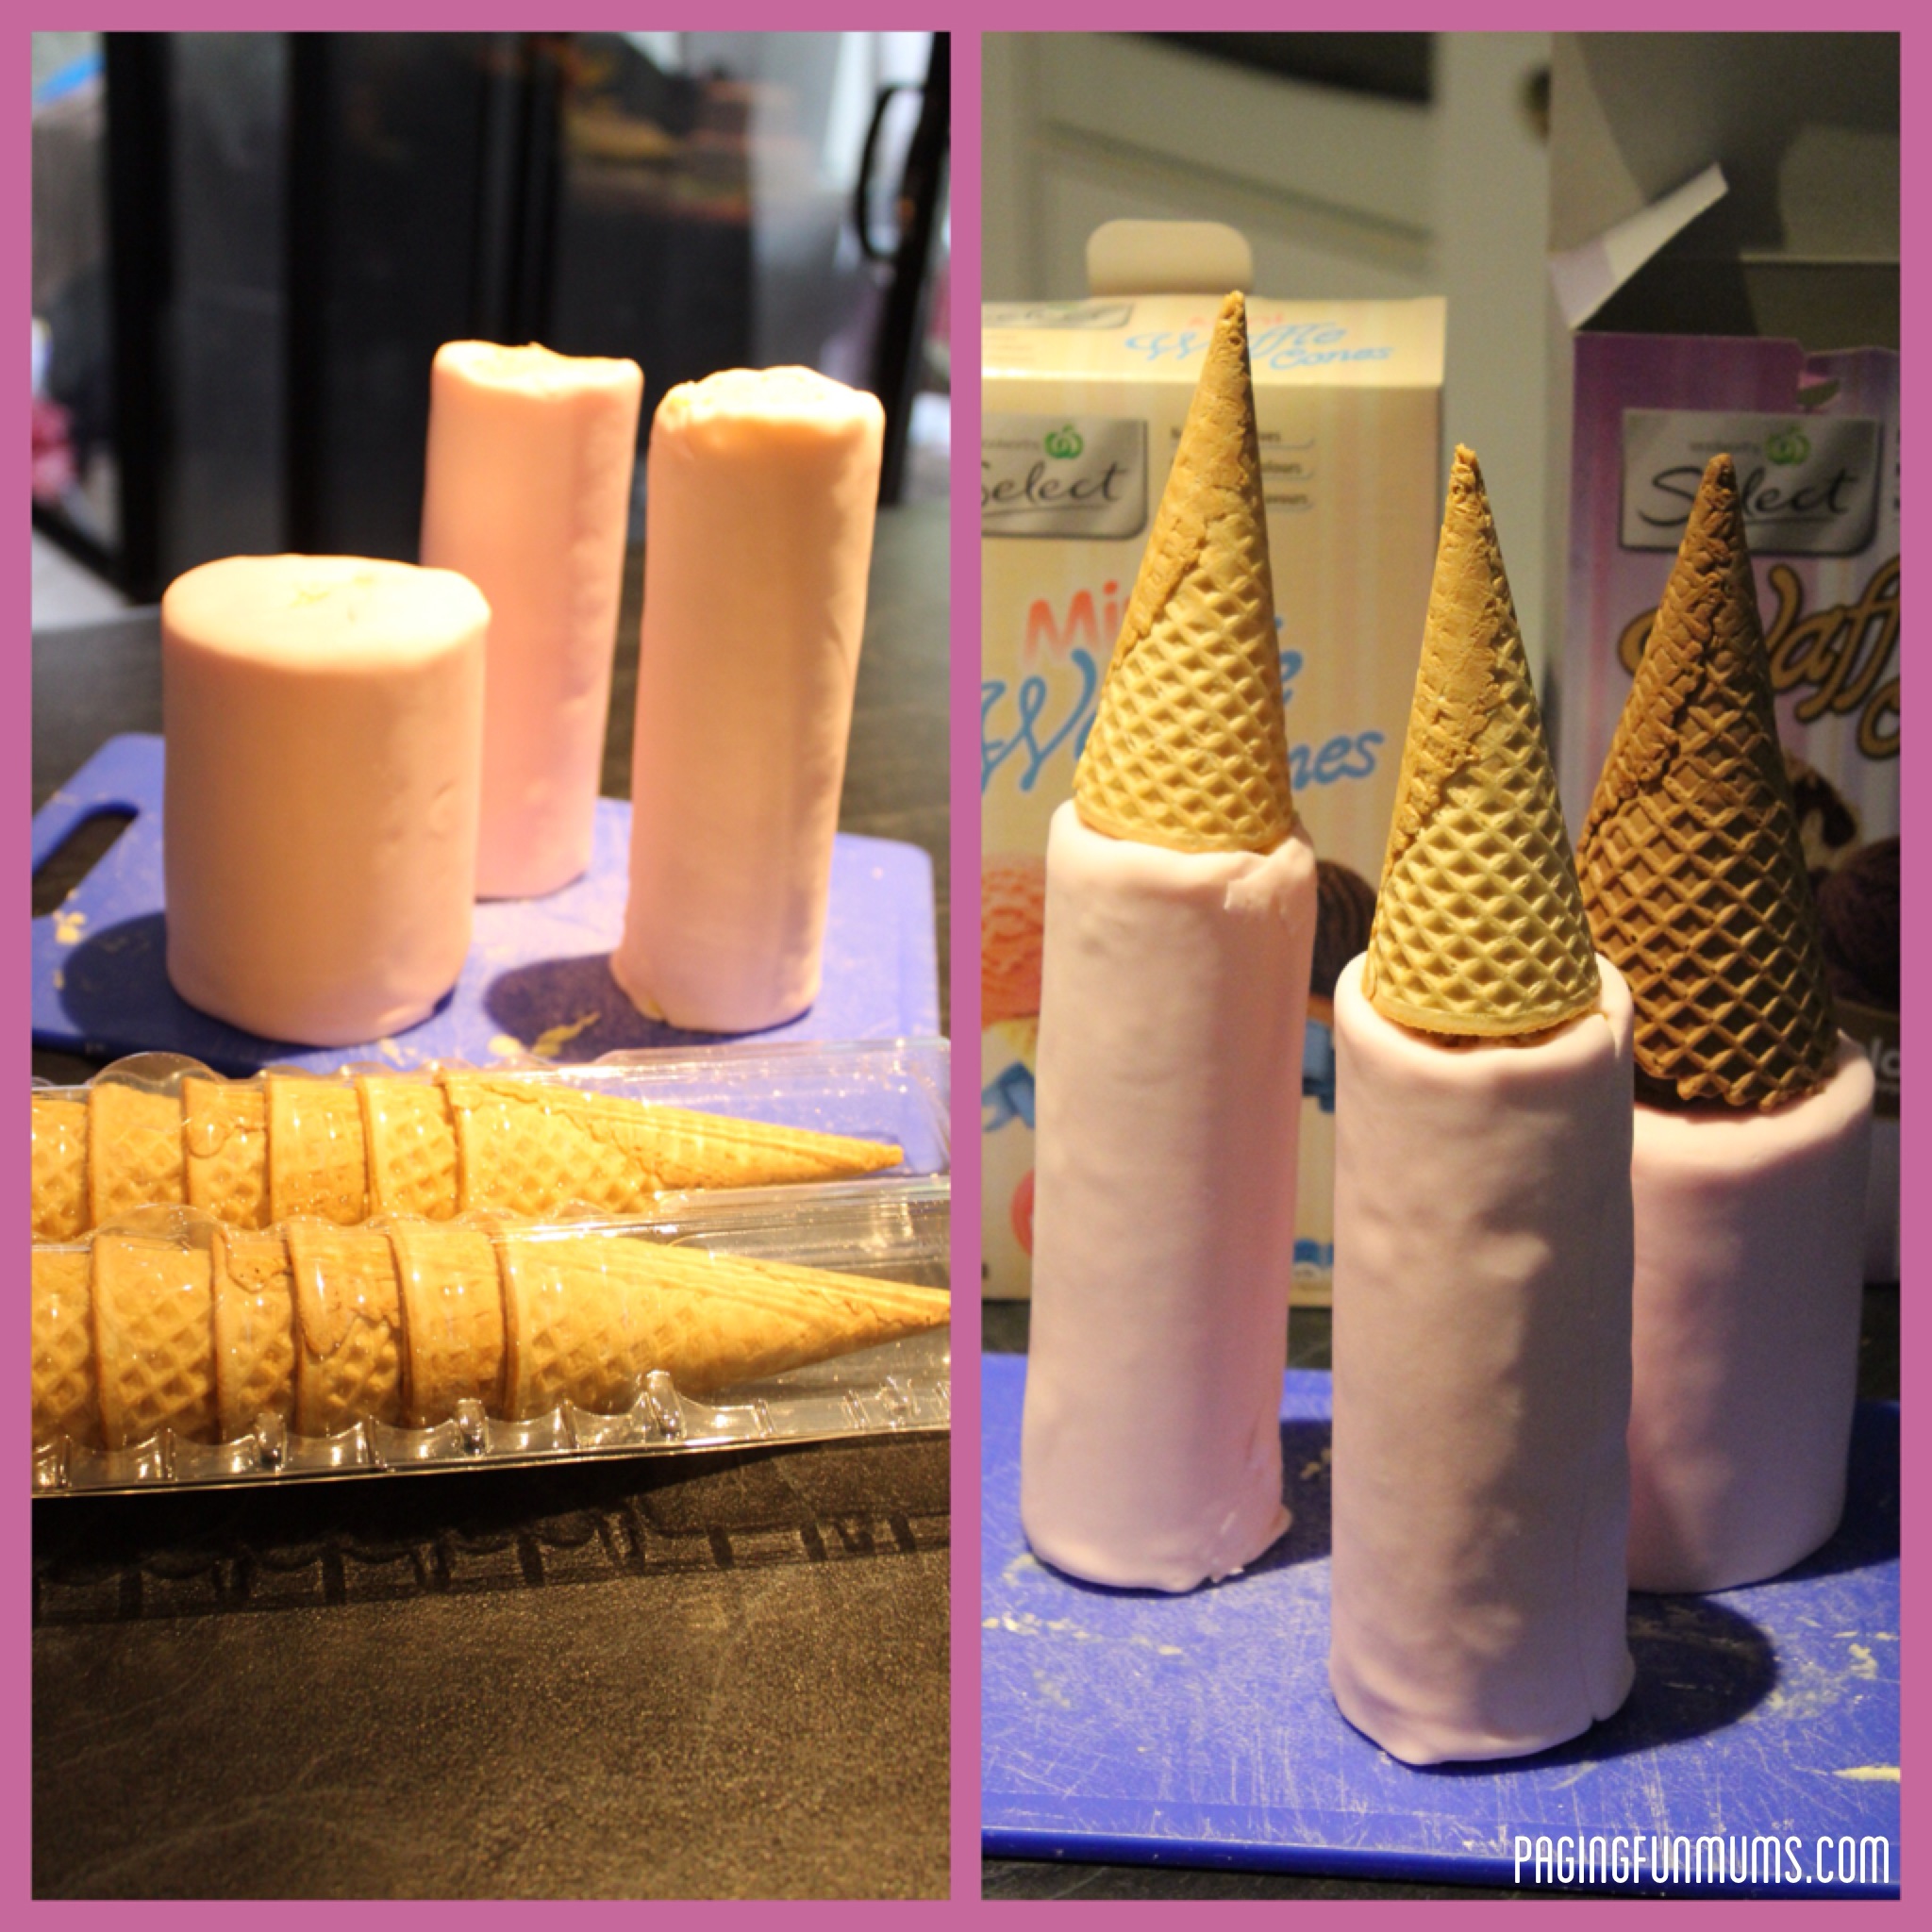
I found several cakes on Pinterest that had used upside down waffle ice cream cones for the tops of their towers and thought that was an AWESOME and EASY idea.
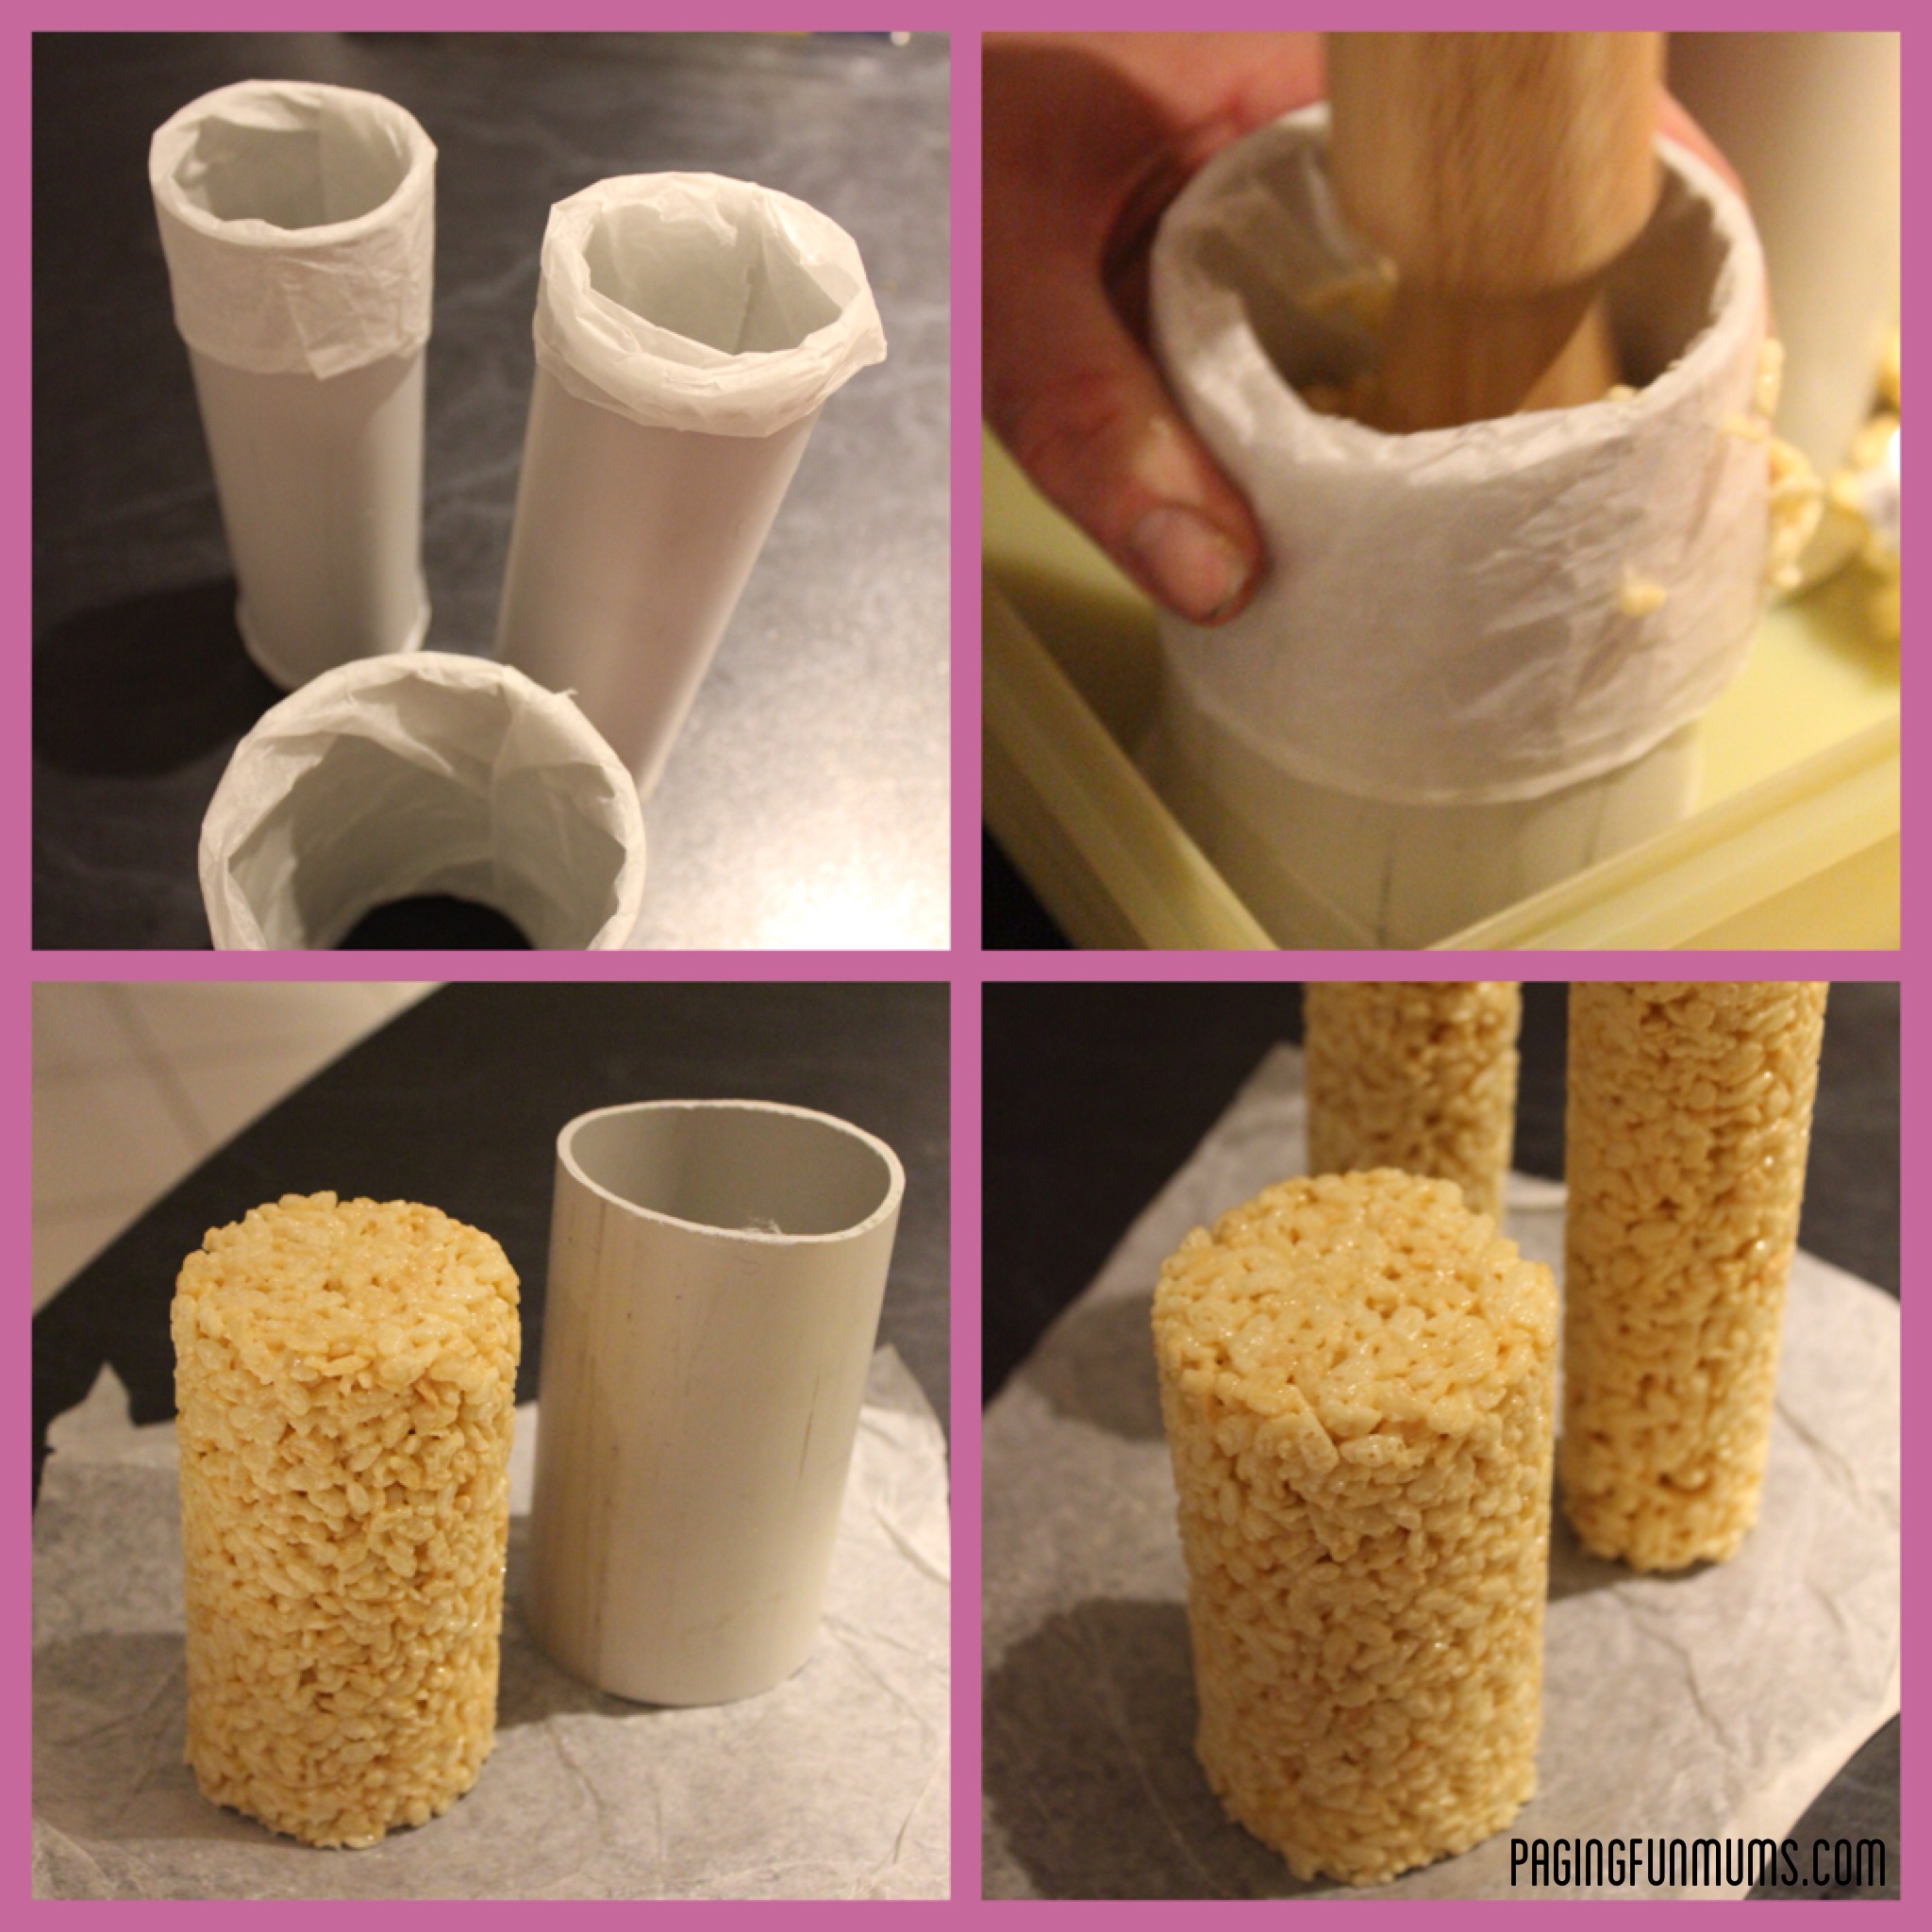
I am pretty lucky to have a very close friend who is American and had introduced me to Rice Krispy treats many, many years ago. I knew it wouldn’t be a drama to make the towers using this method as long as I could find the right sized cylinders to fill.
I hit our local pluming supply store for some ‘FREE’ PVC pipe off-cuts and was greeted with “The most helpful Man” – he helped cut everything to the correct size and when he found out ot was for my daughters Birthday he refused to charge me!
I gave the pipes a very thorough clean and lined them with greaseproof paper (folding the paper at the top and bottom as pictured). I then made the Krispy Treat as per this recipe previously shared on our page – http://wp.me/p2Uher-1FZ
I spooned in enough mixture to fill the tube one third the way up then compacted it down using the end of a rolling pin – I repeated this until all three were full. Then they were left to set fully overnight before sliding the Krispy Towers free – this was surprisingly easy ;).
Then it was time to cover the waffle cones – I made up a batch of powdered Royal Icing and spread that evenly over the cones before rolling them in hundred’s and thousand’s. I then left them to dry overnight.
The next day everything was ready for the fondant – including the two cakes that I had made by my local baker – that’s right…I don’t bake my own cakes!!! After too many failed attempts I now order the cakes un-iced and leave the baking to the professionals & their mega ovens.
I made a double batch of simple Butter Icing and iced the two cake layers and also the towers – I then placed them in the fridge for roughly one hour to ‘crust’ or stiffen.
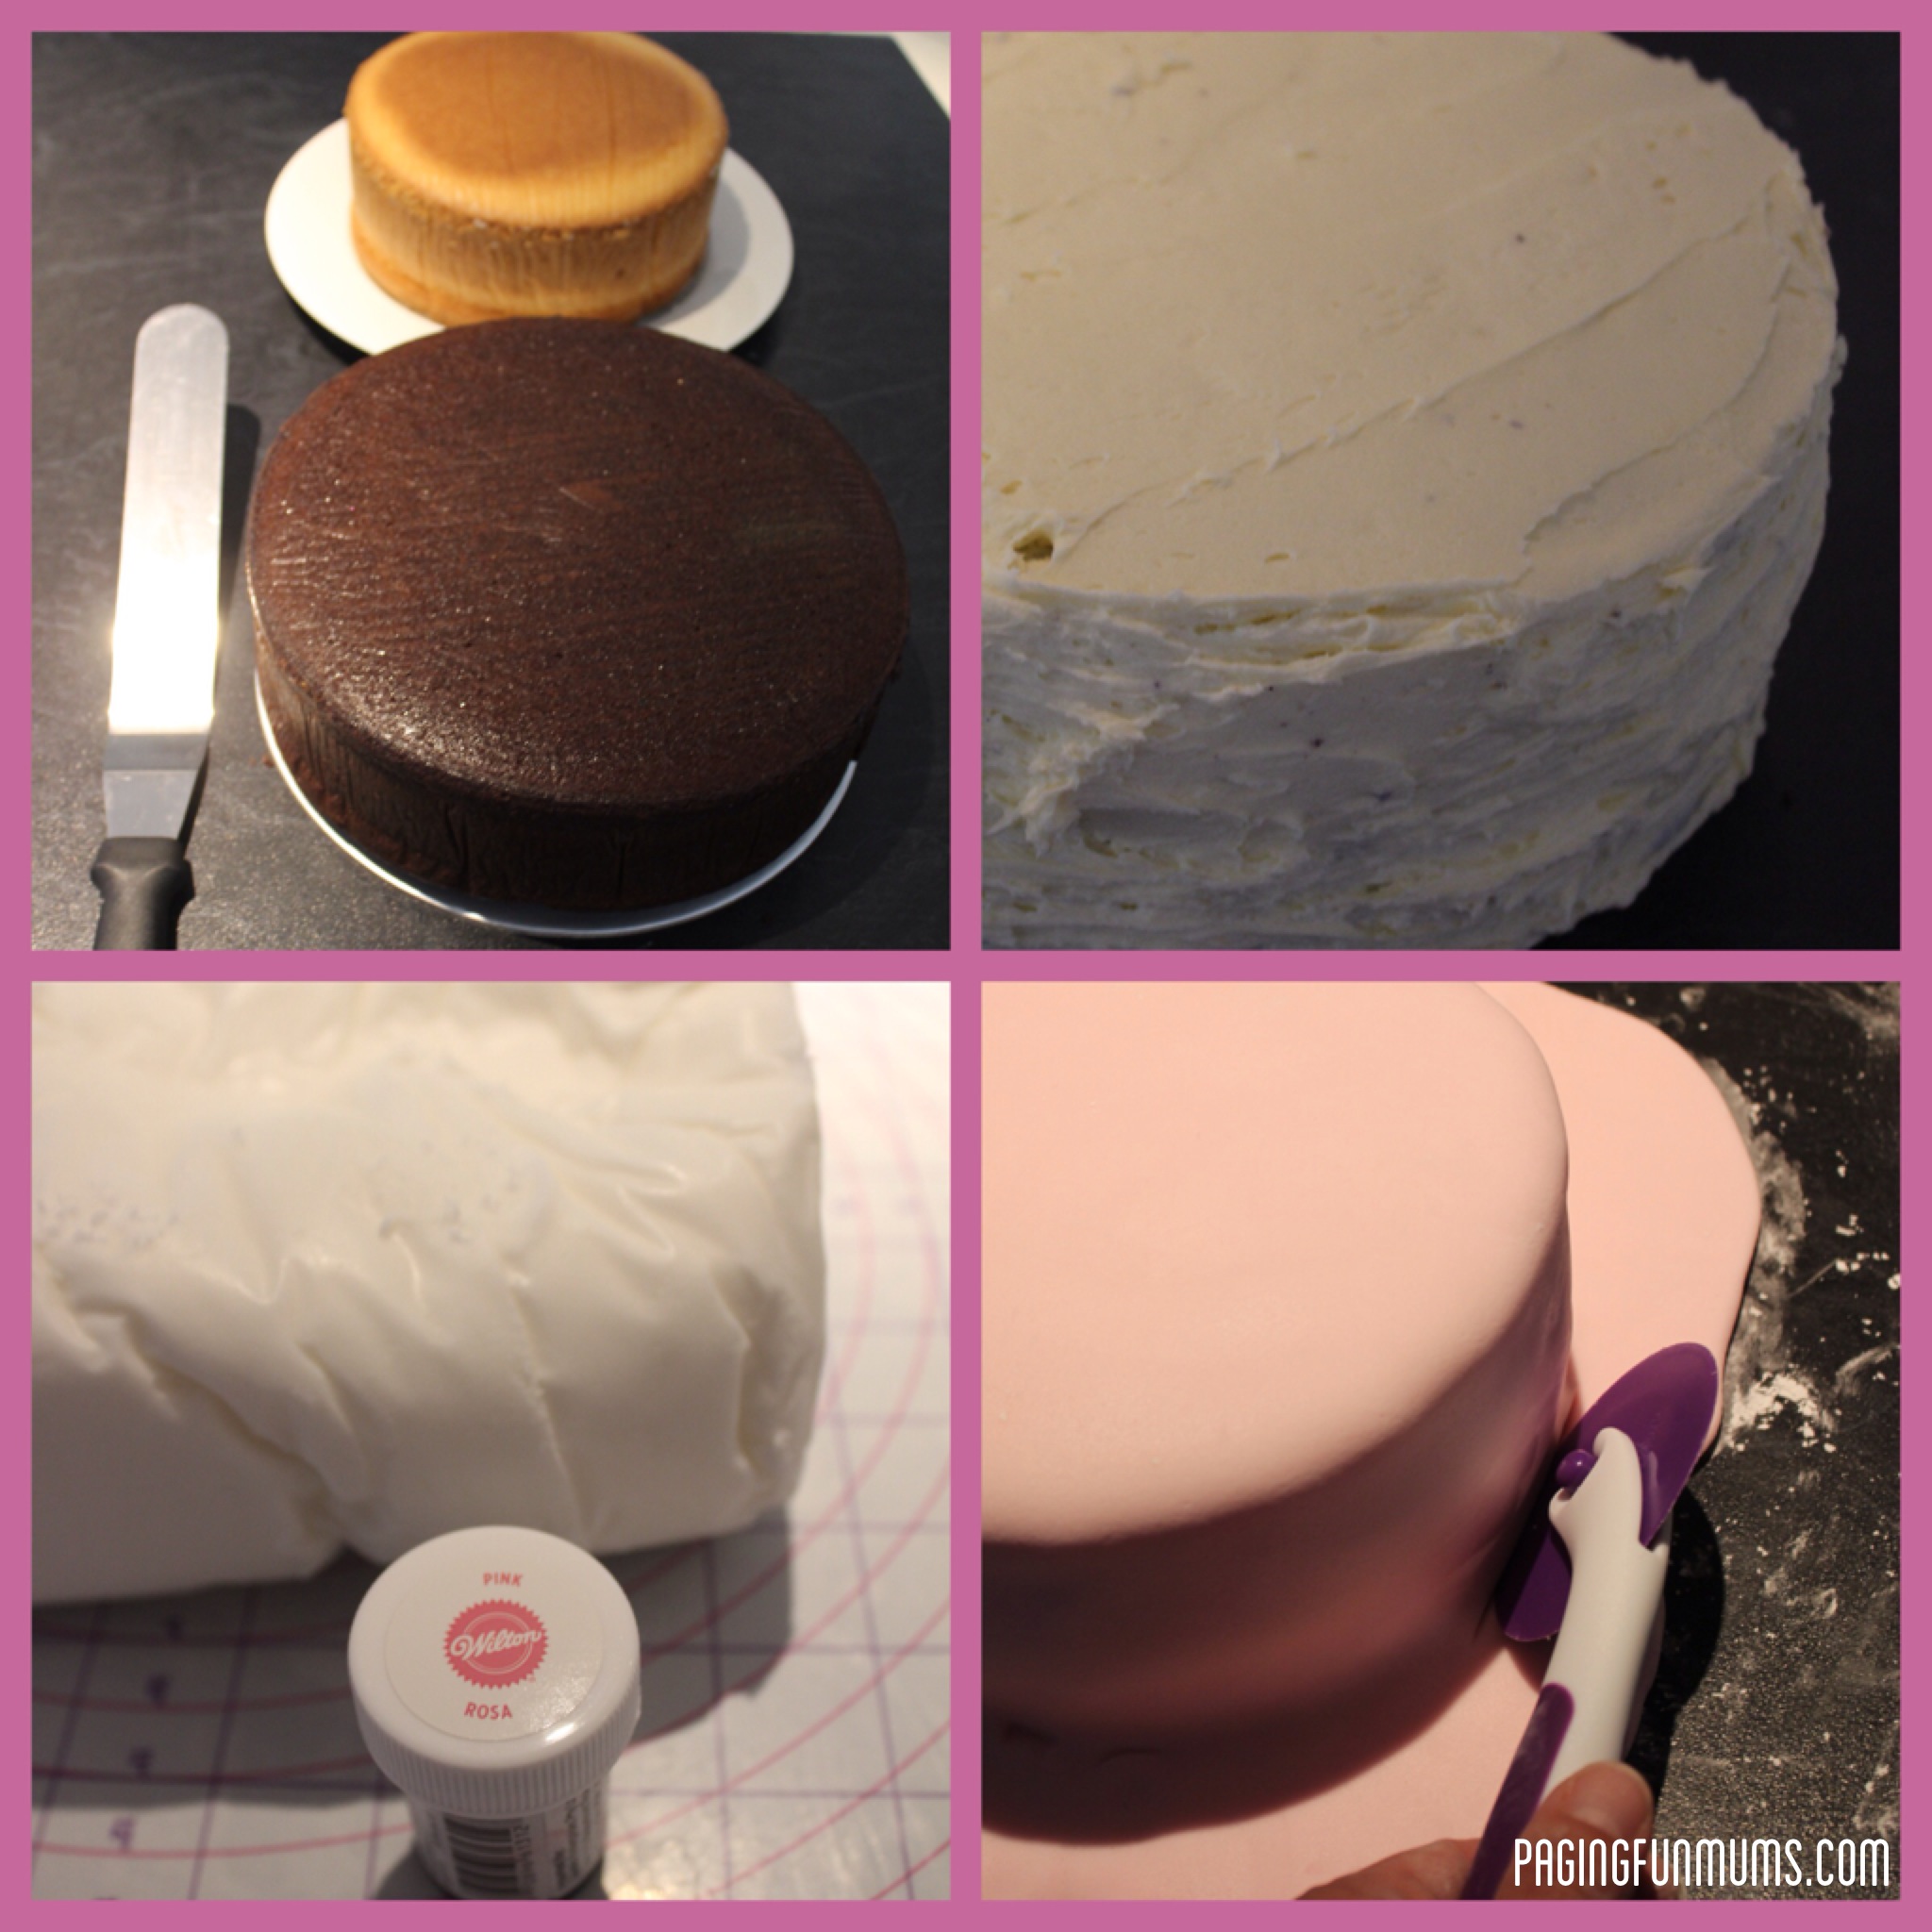
While the cakes and towers were cooling in the oven I started to colour my fondant – for the main cakes – I knew I would need roughly 2KG of pale pink and 1kg of bright pink for the bricks and another 500g of green for the base.
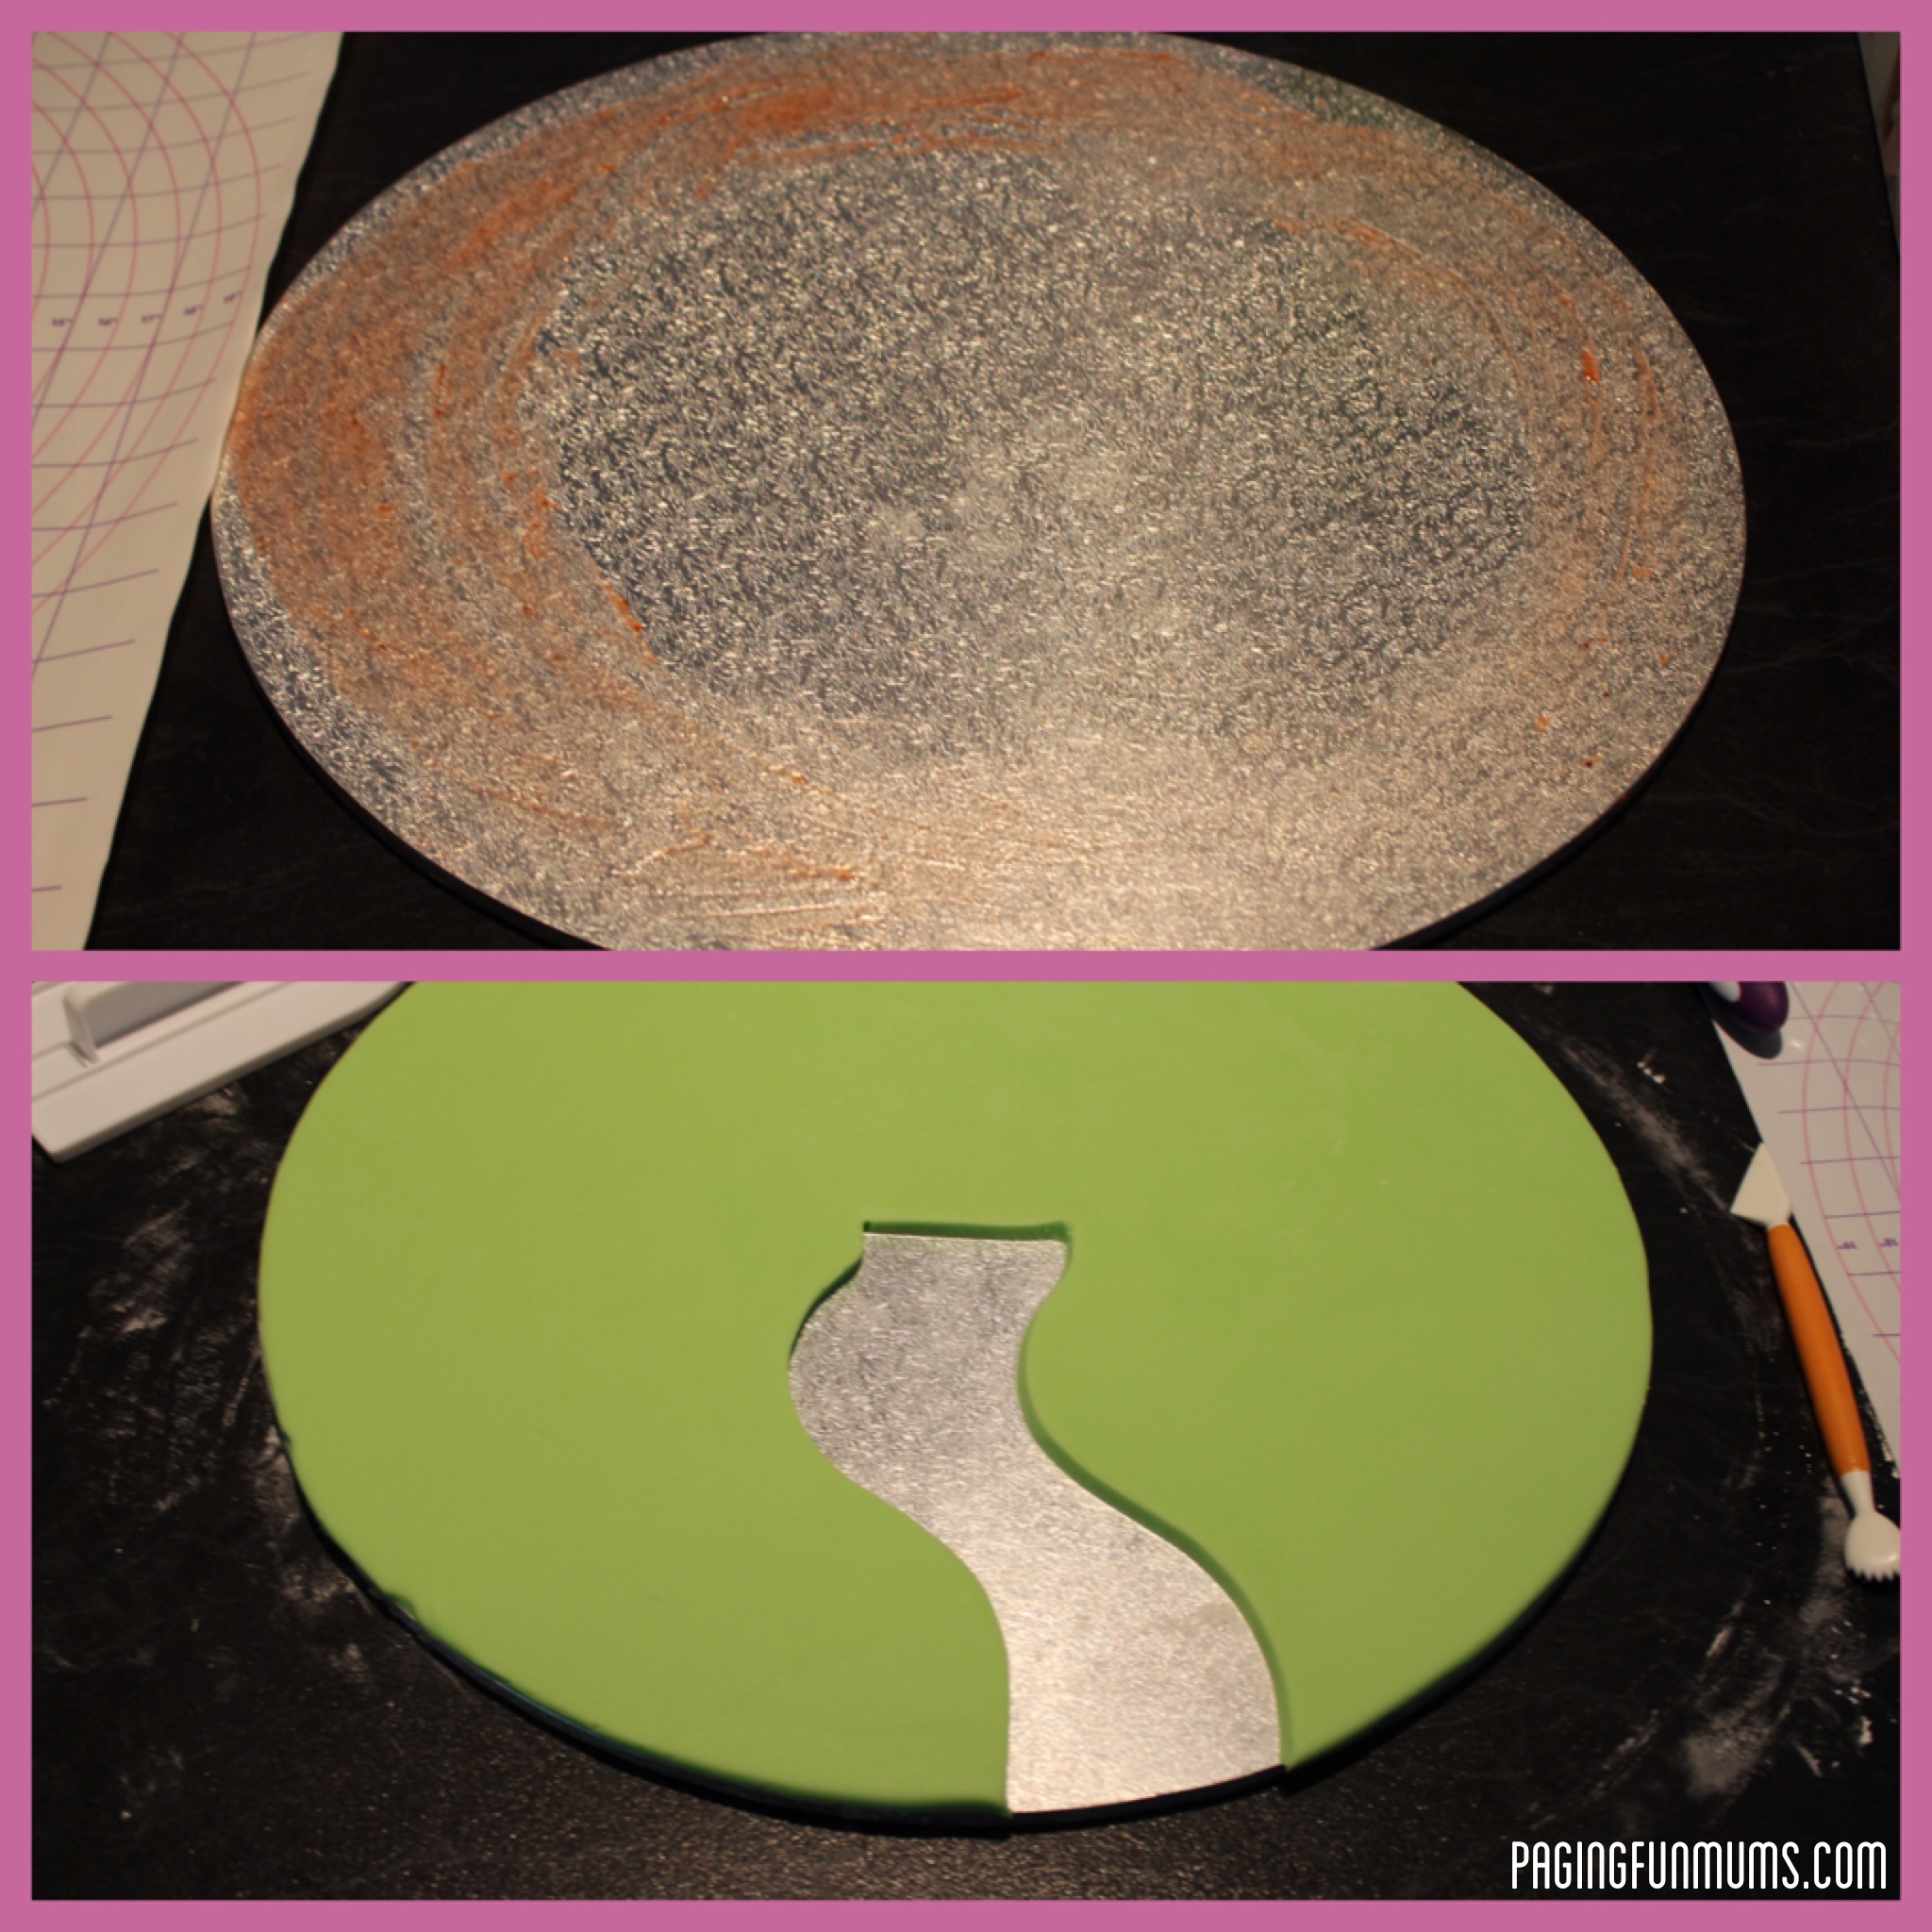
I started by spreading a small amount of melted jam around the outside of the cake base to help the fondant ‘stick’ to the base. I then rolled out and covered the wooden cake base with green fondant – I removed a secton to make a garden path (I kept this to use later as the green vines).
I then kneaded the pale pink fondant and covered the two tiers of cake. I used wooden dowl and cardboard cake bases to ‘stack’ the cake up once covered.
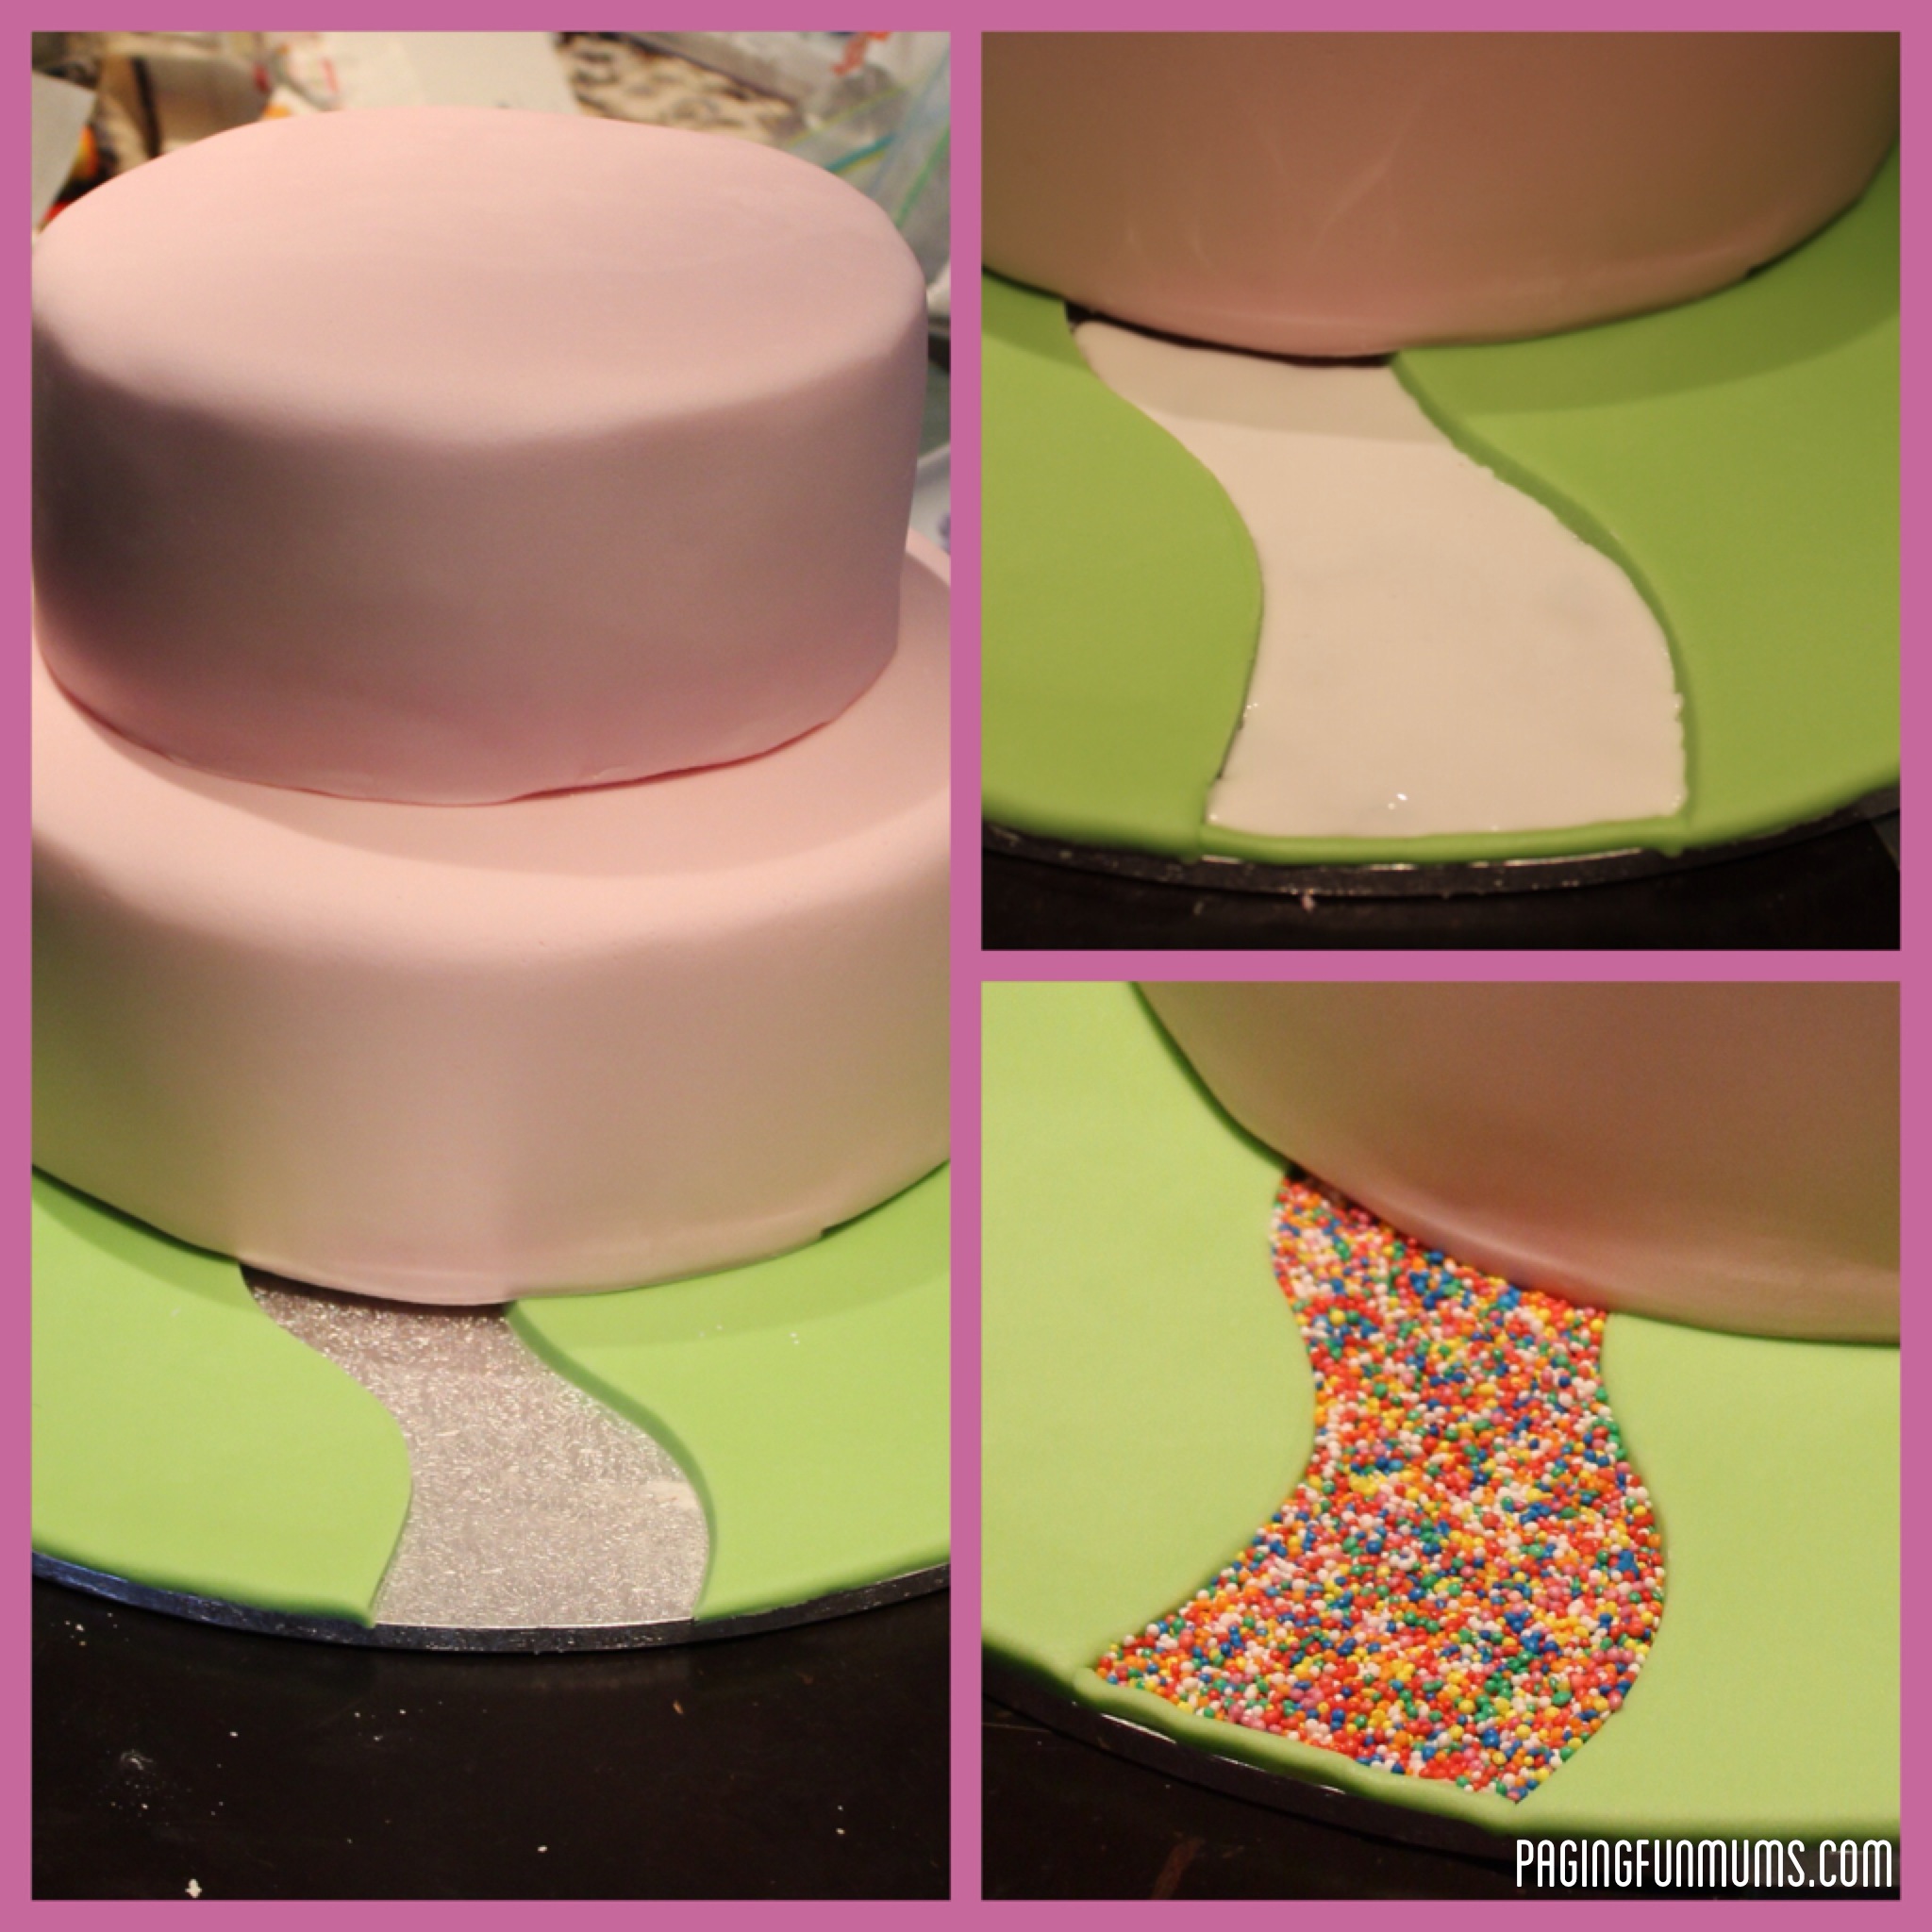
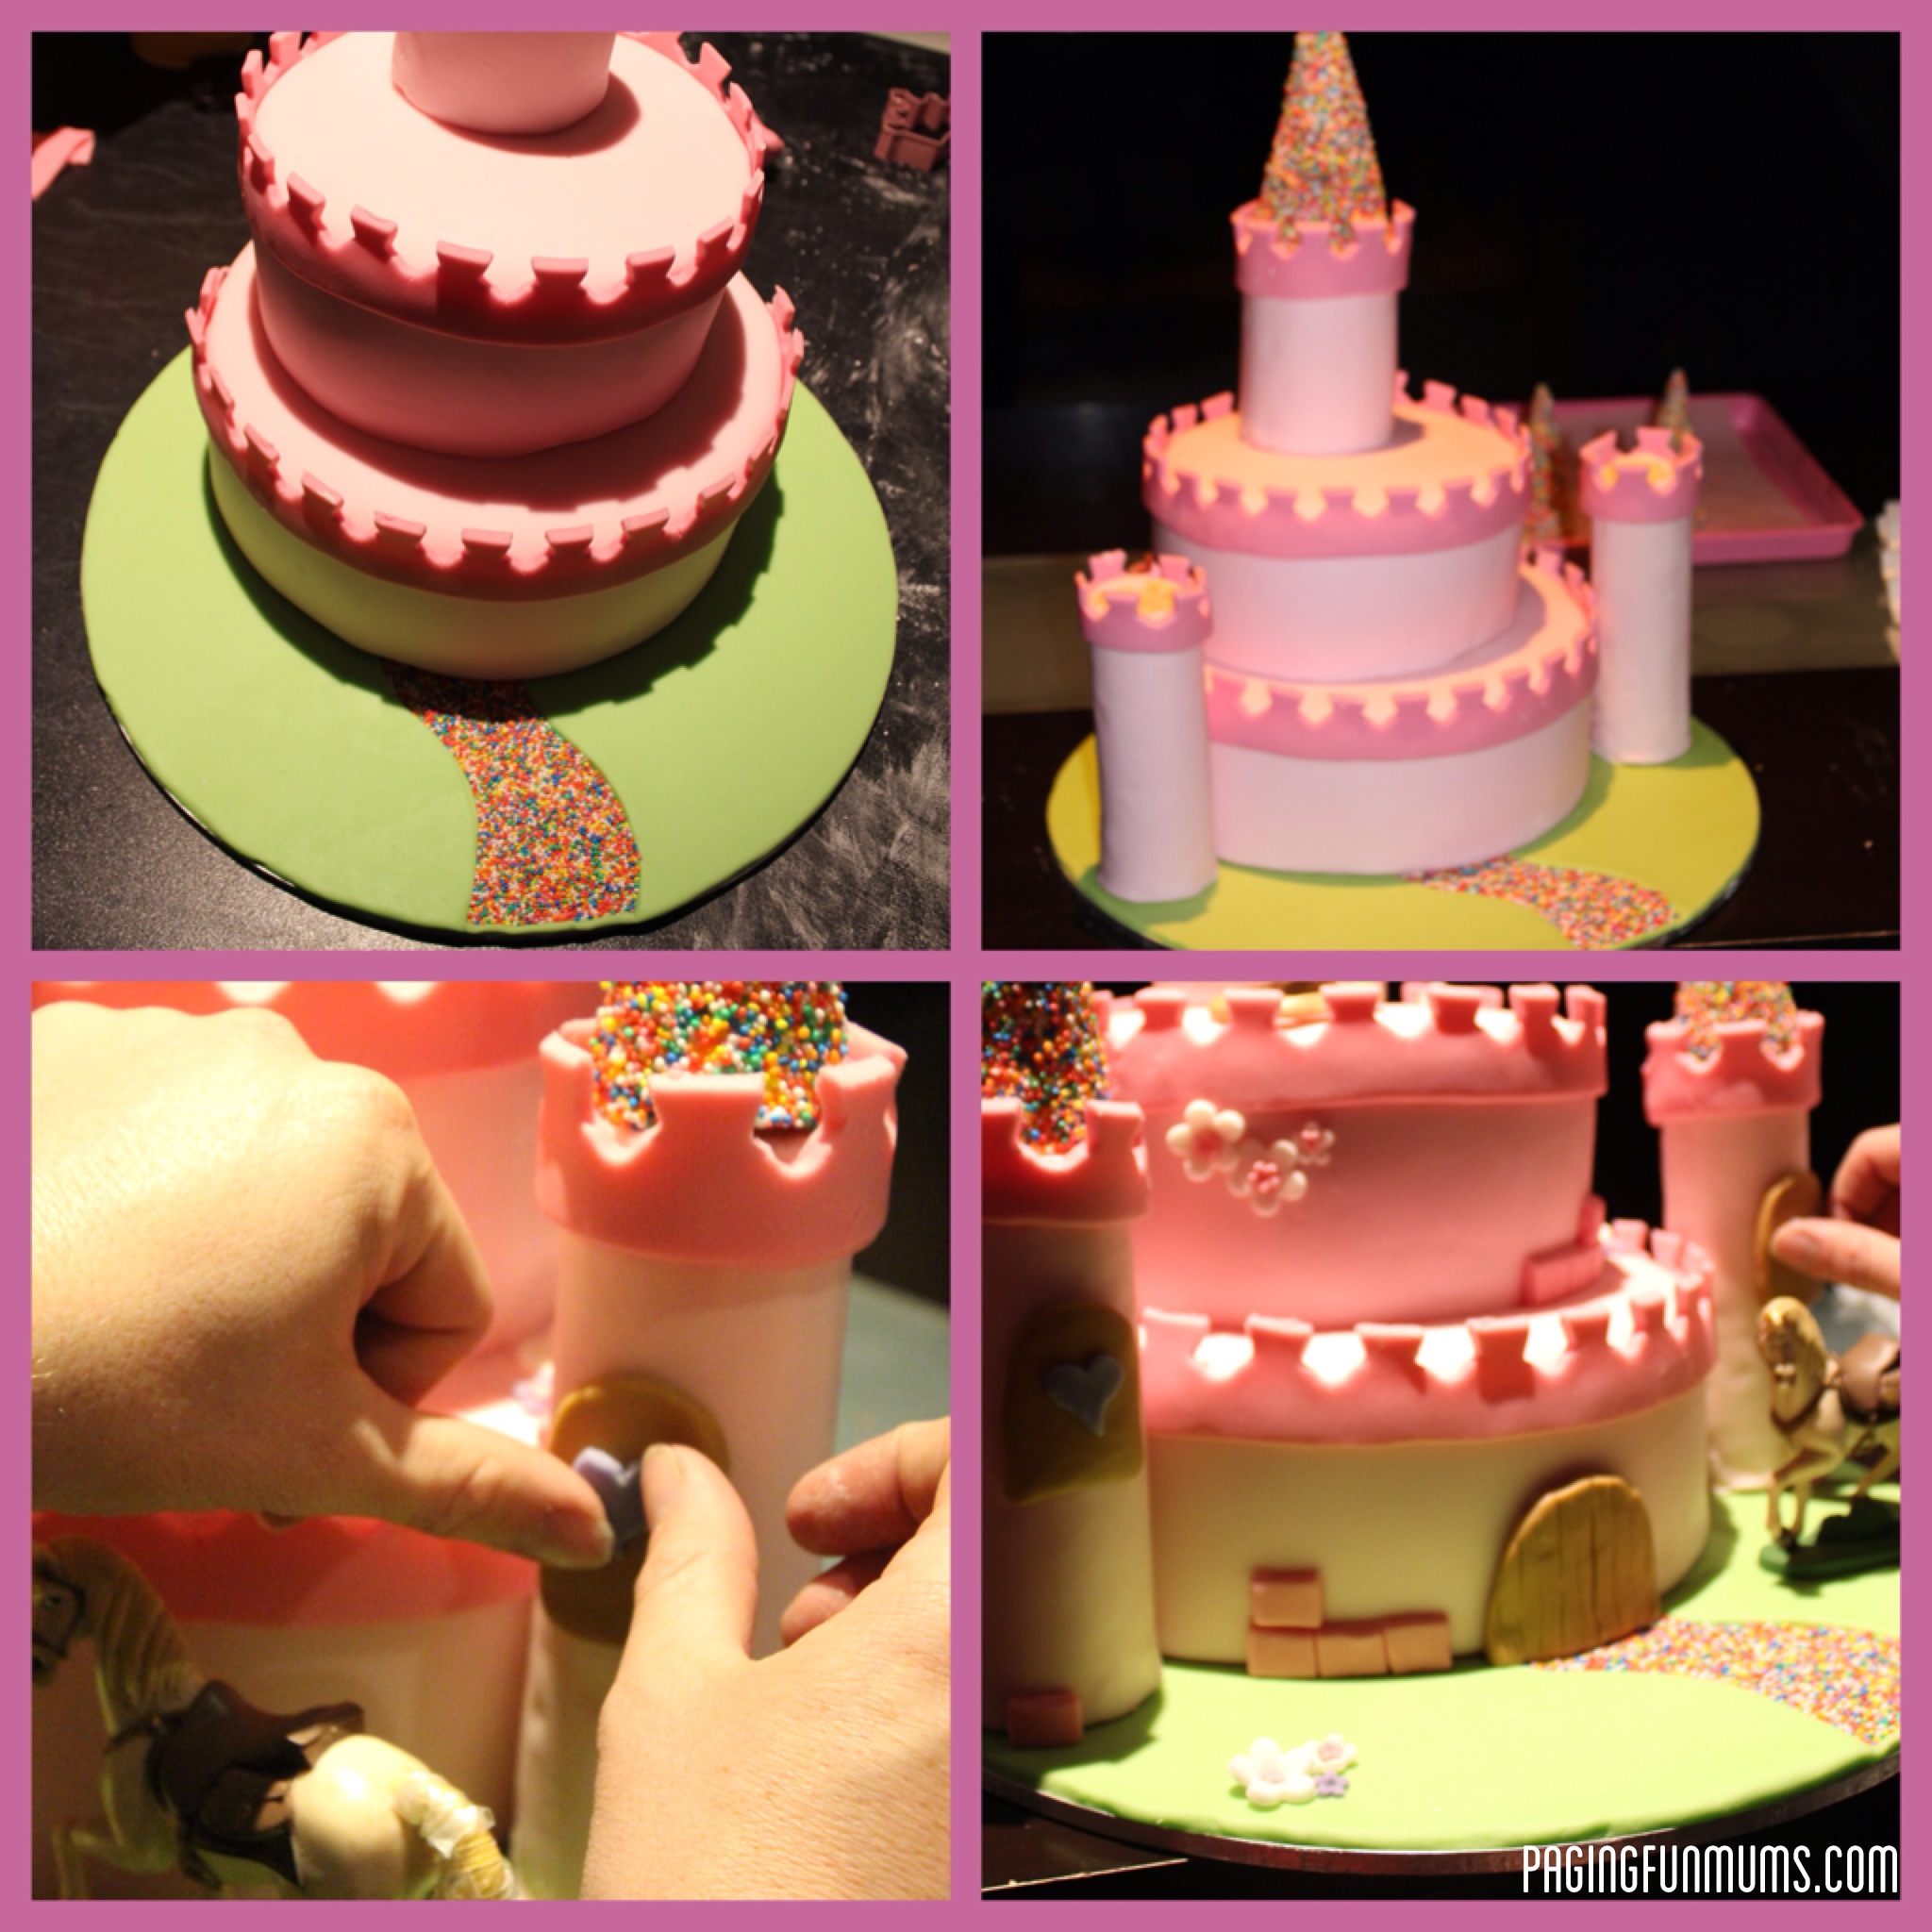
I then cut put a garden path to later fill with 100’s and 1000’s to match the tower tops (waffle cones). This was filled with the same royal icing I used to cover the waffle cones. After the wet Royal Icing was piped along the path I gently sprinkled 100’s and 1000’s to fill the gap.
I added the towers to the cake making sure the inside join was towards the inside of the cake.
Then came the FUN part – decorating the cake with the bricks, flowers, vines and rapunzle centerpieces which I bought on ebay.
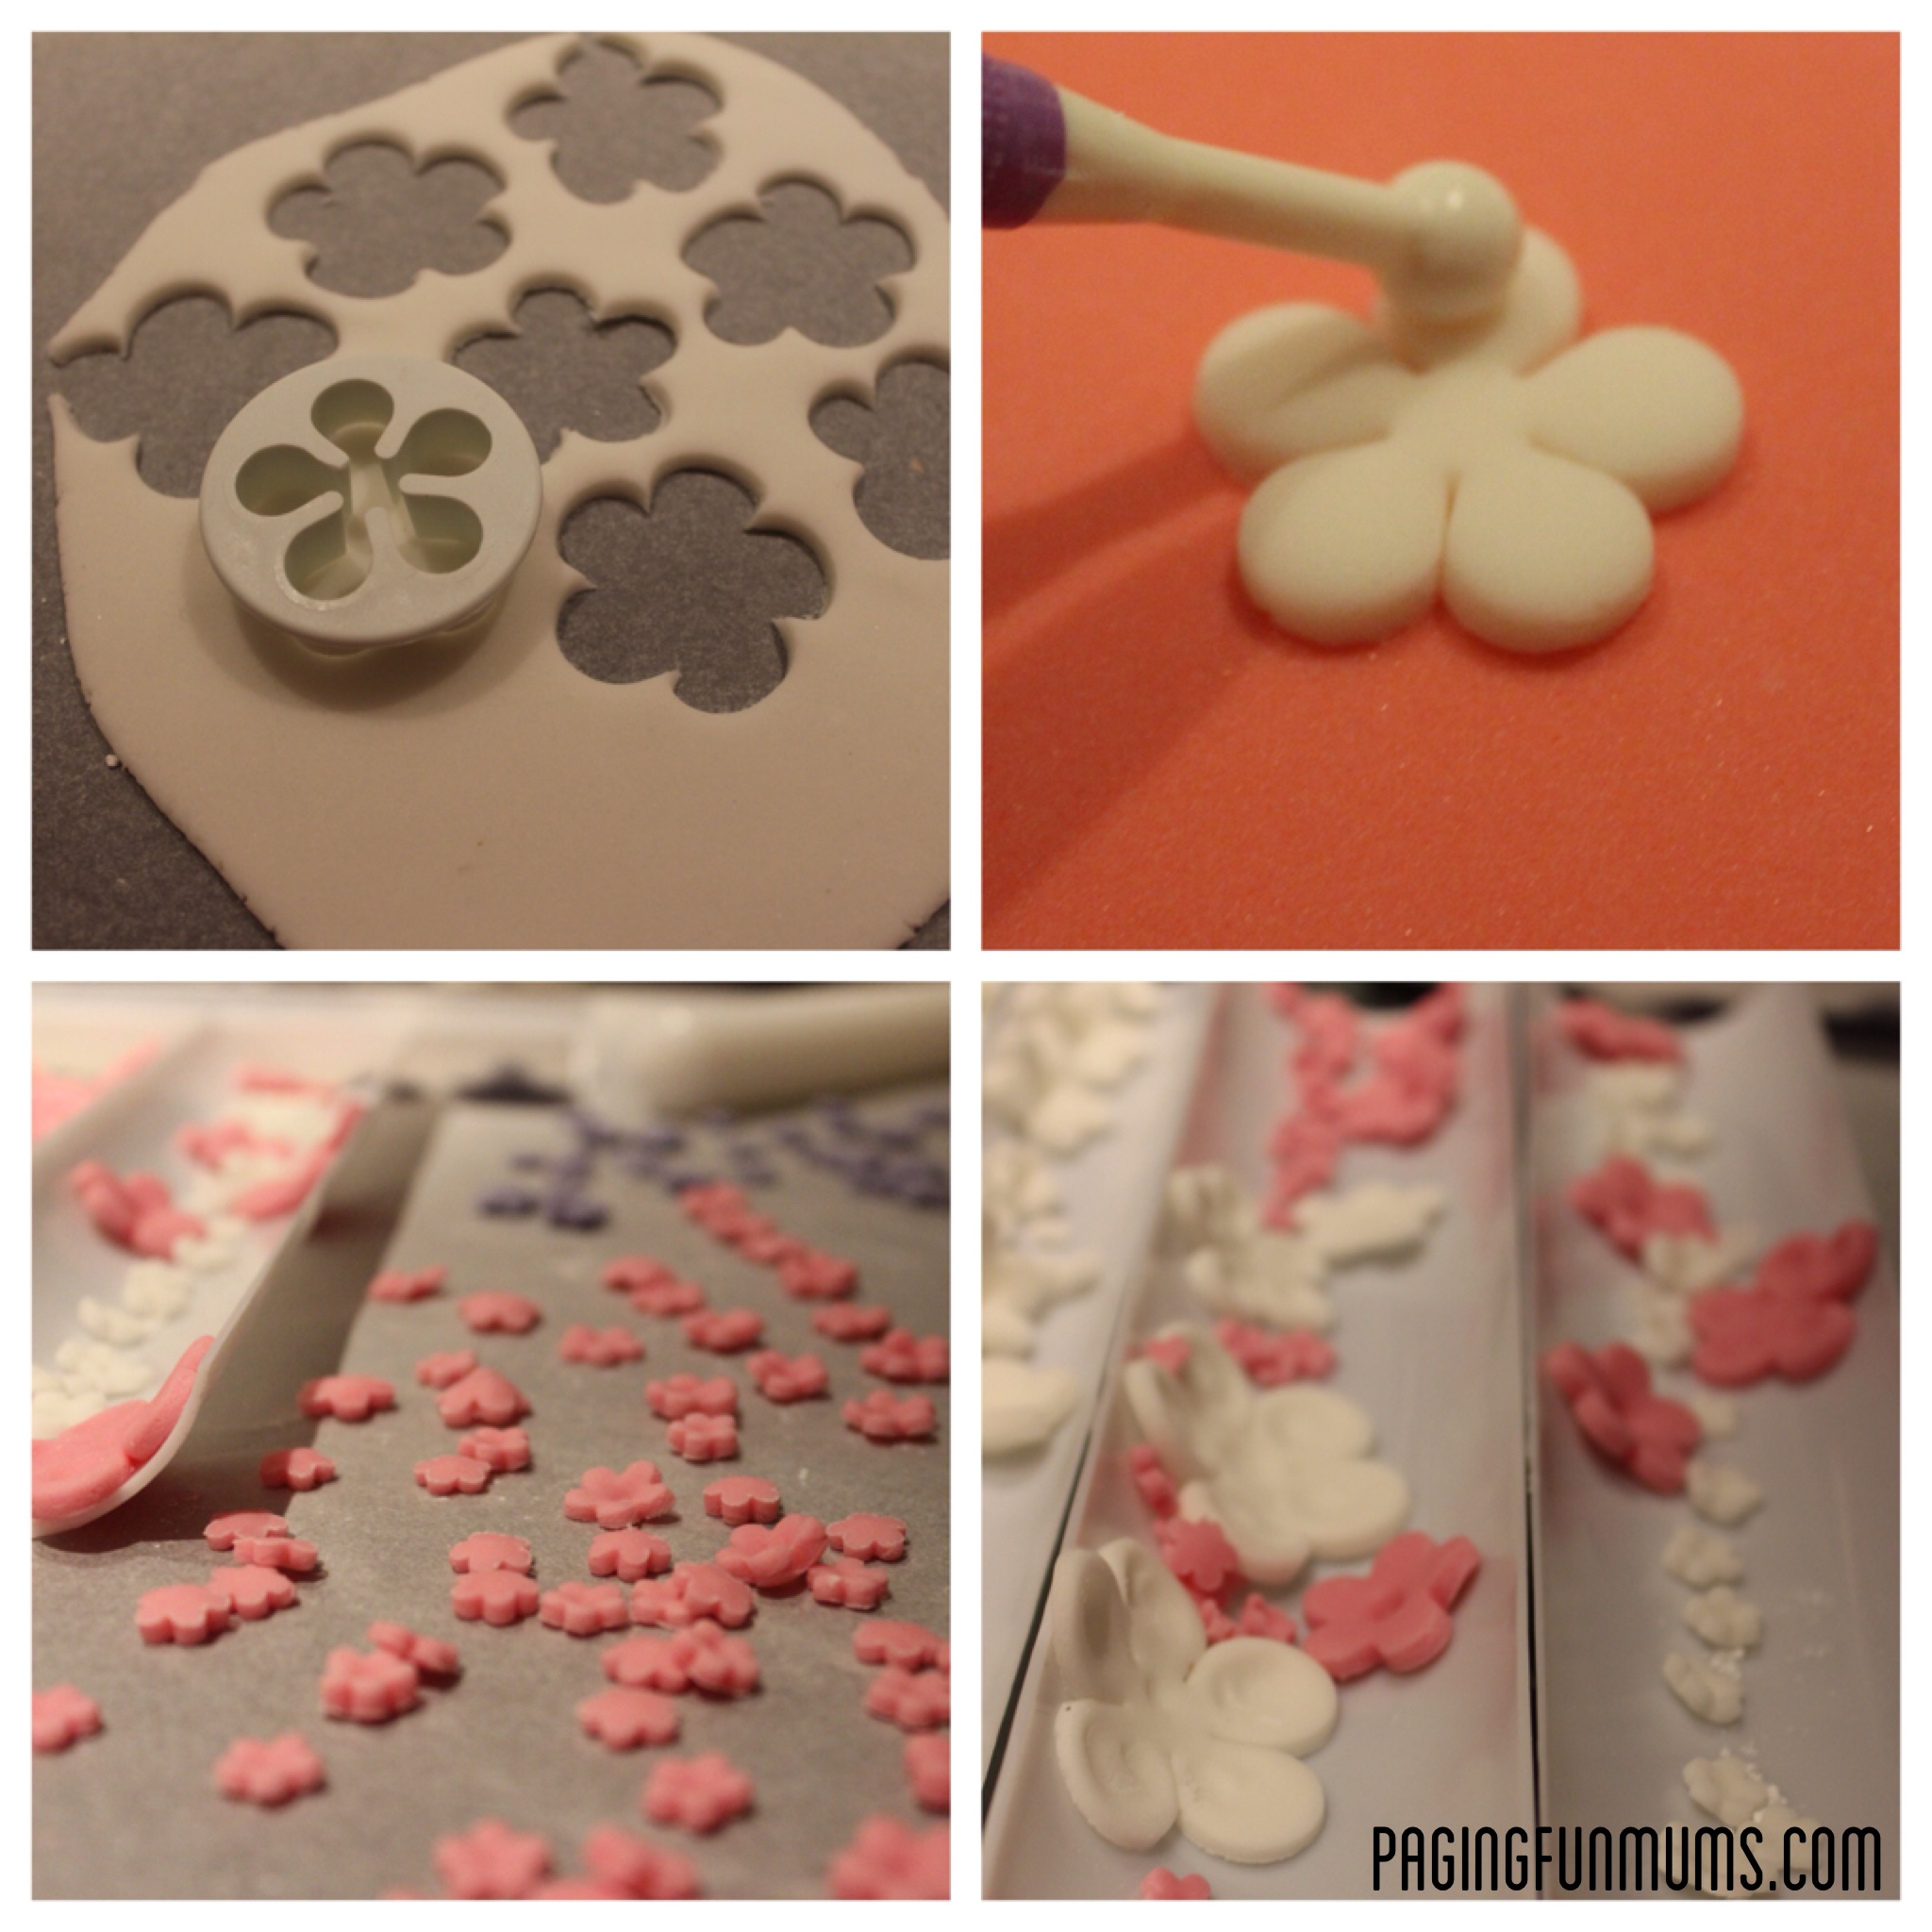
I made the flowers using some little flower cutters (I borrowed these from a very good freind of mine – Thanks Bec!!!) and gave them a little shape by using the ball tool in a small circular motion on each petal – I then dried them in the rounded plastic trays to give them a 3D dimension.
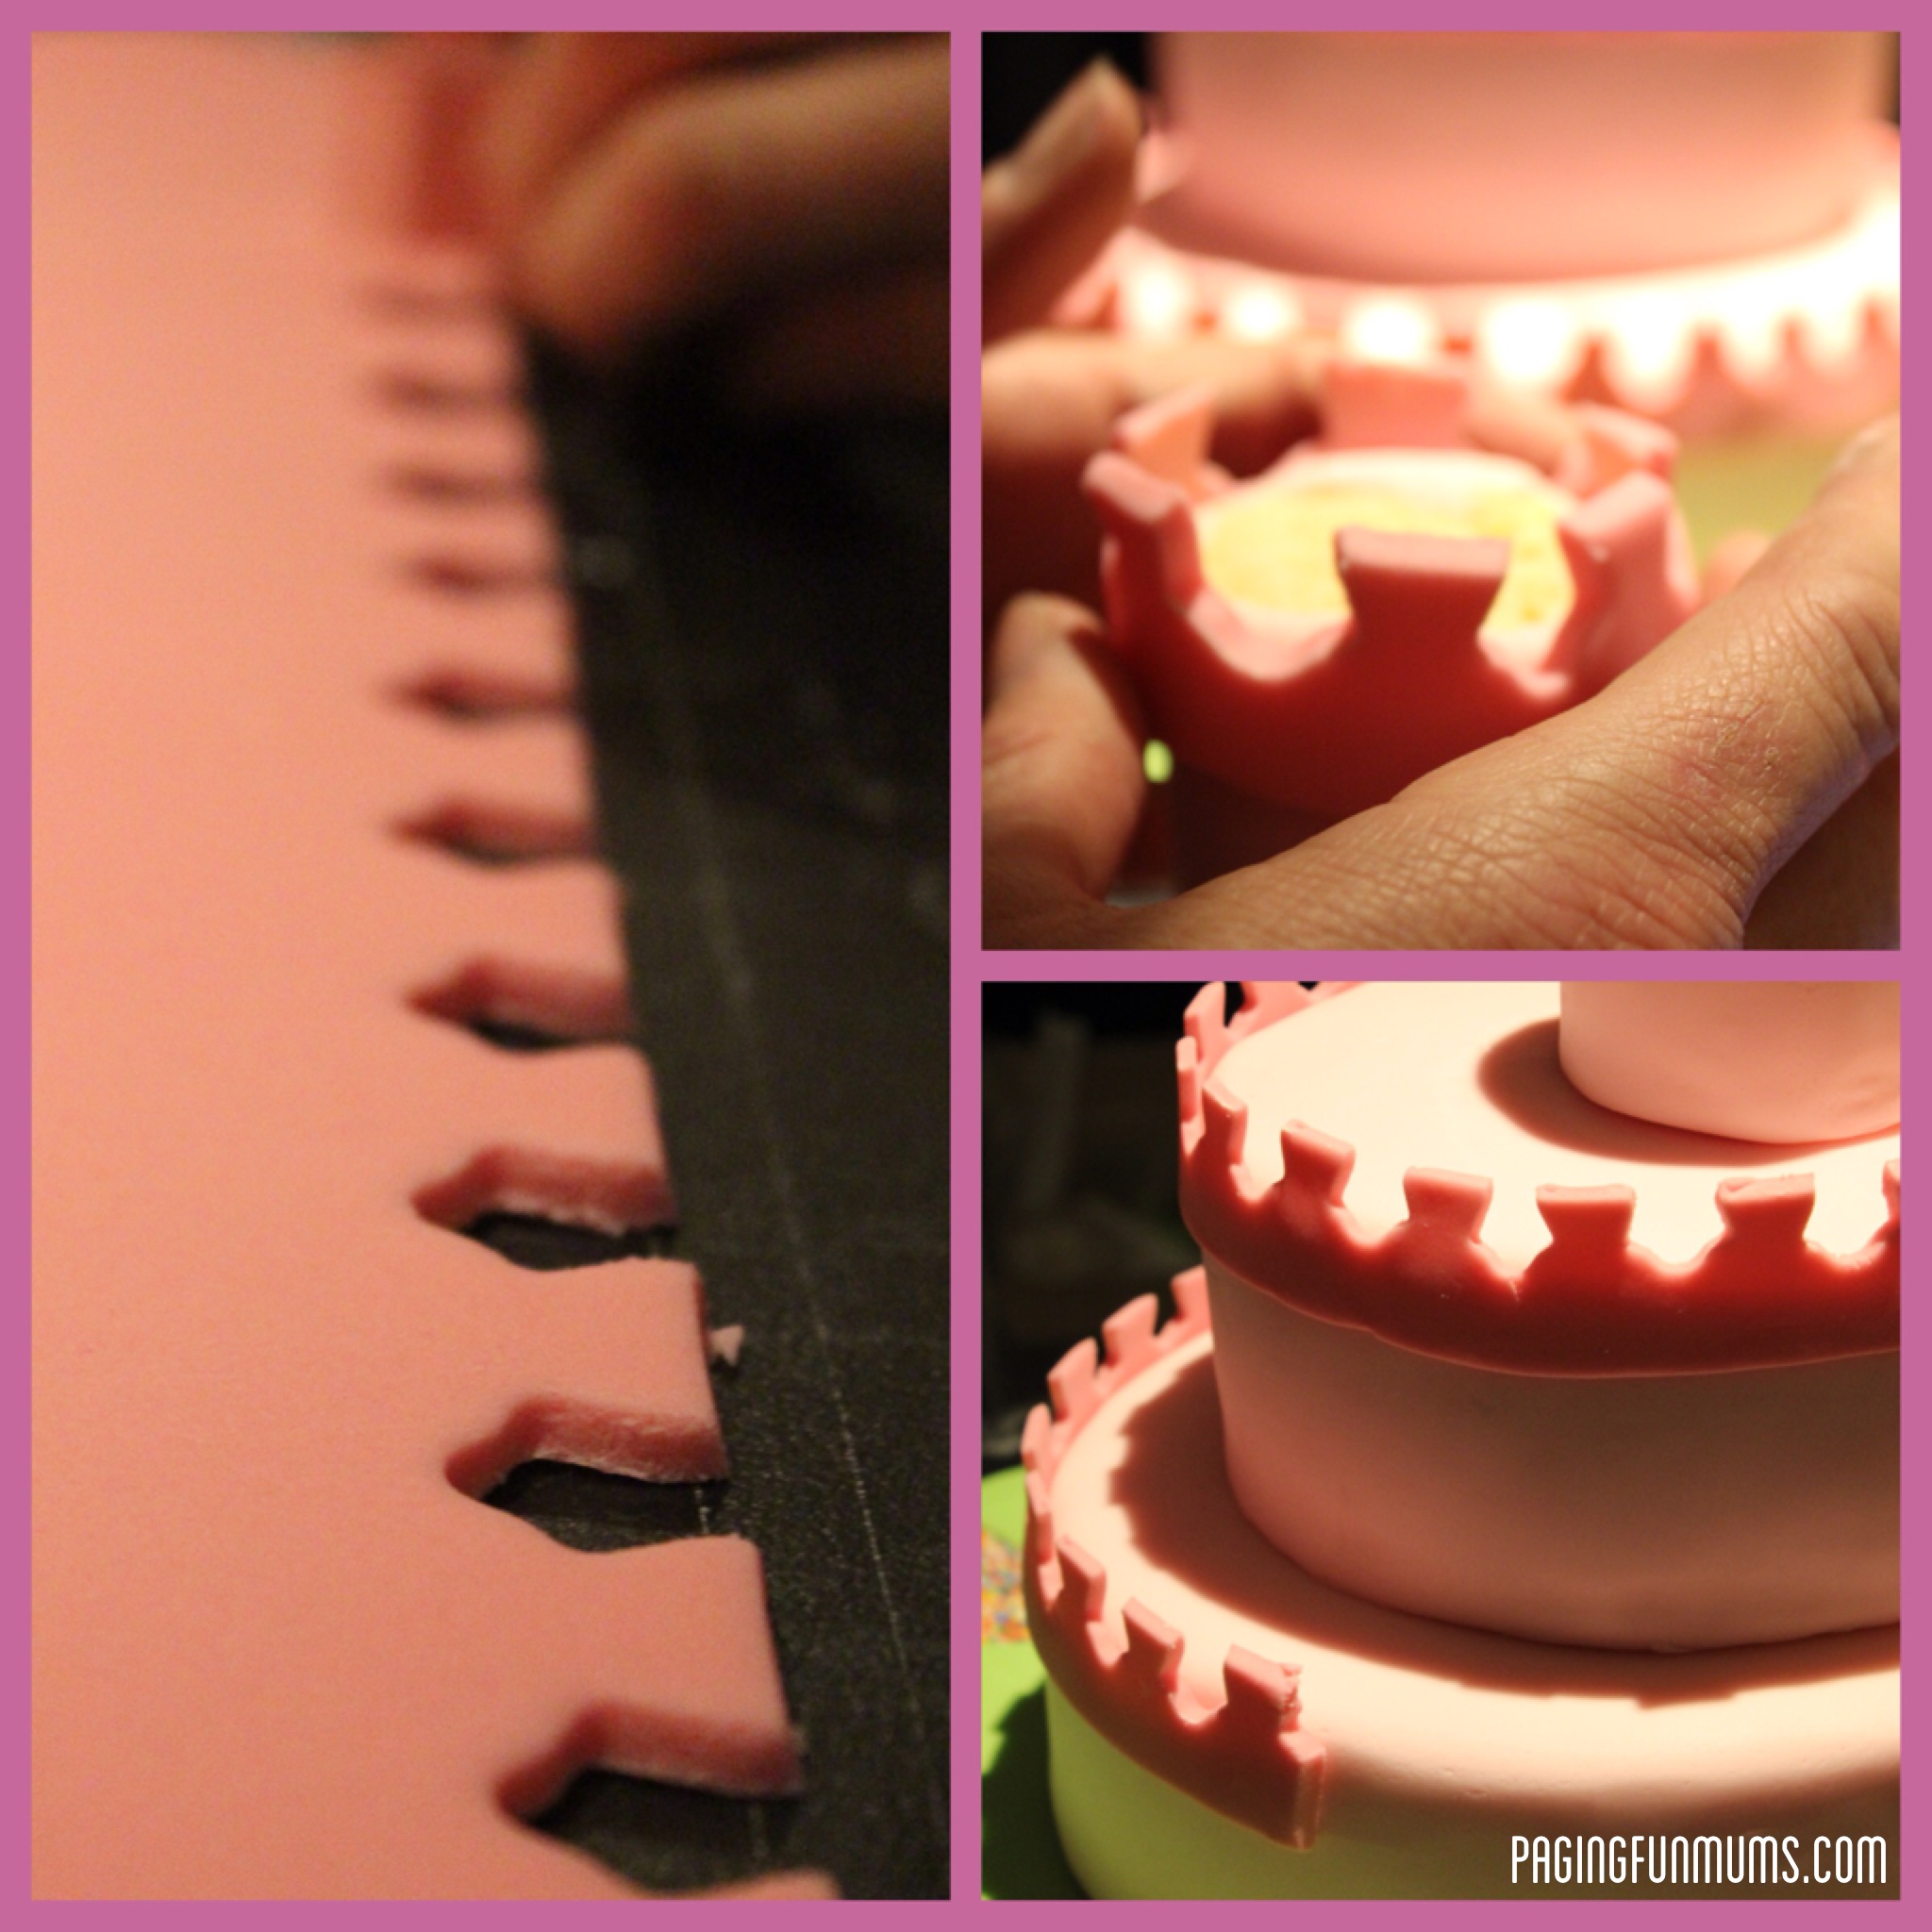
We rolled out the fondant and used a crown cookie cutter to evenly space out the ‘cut-out’ sections of the tops of the castle – these would cover each cake layer and each tower.
We then made some brickwork using a clean ruler to score and cut the bricks evenly.
We made the doors ‘free-hand’ using some brown tinted fondant.
We glued all these decorations using suagr glue (Sugar syrup).
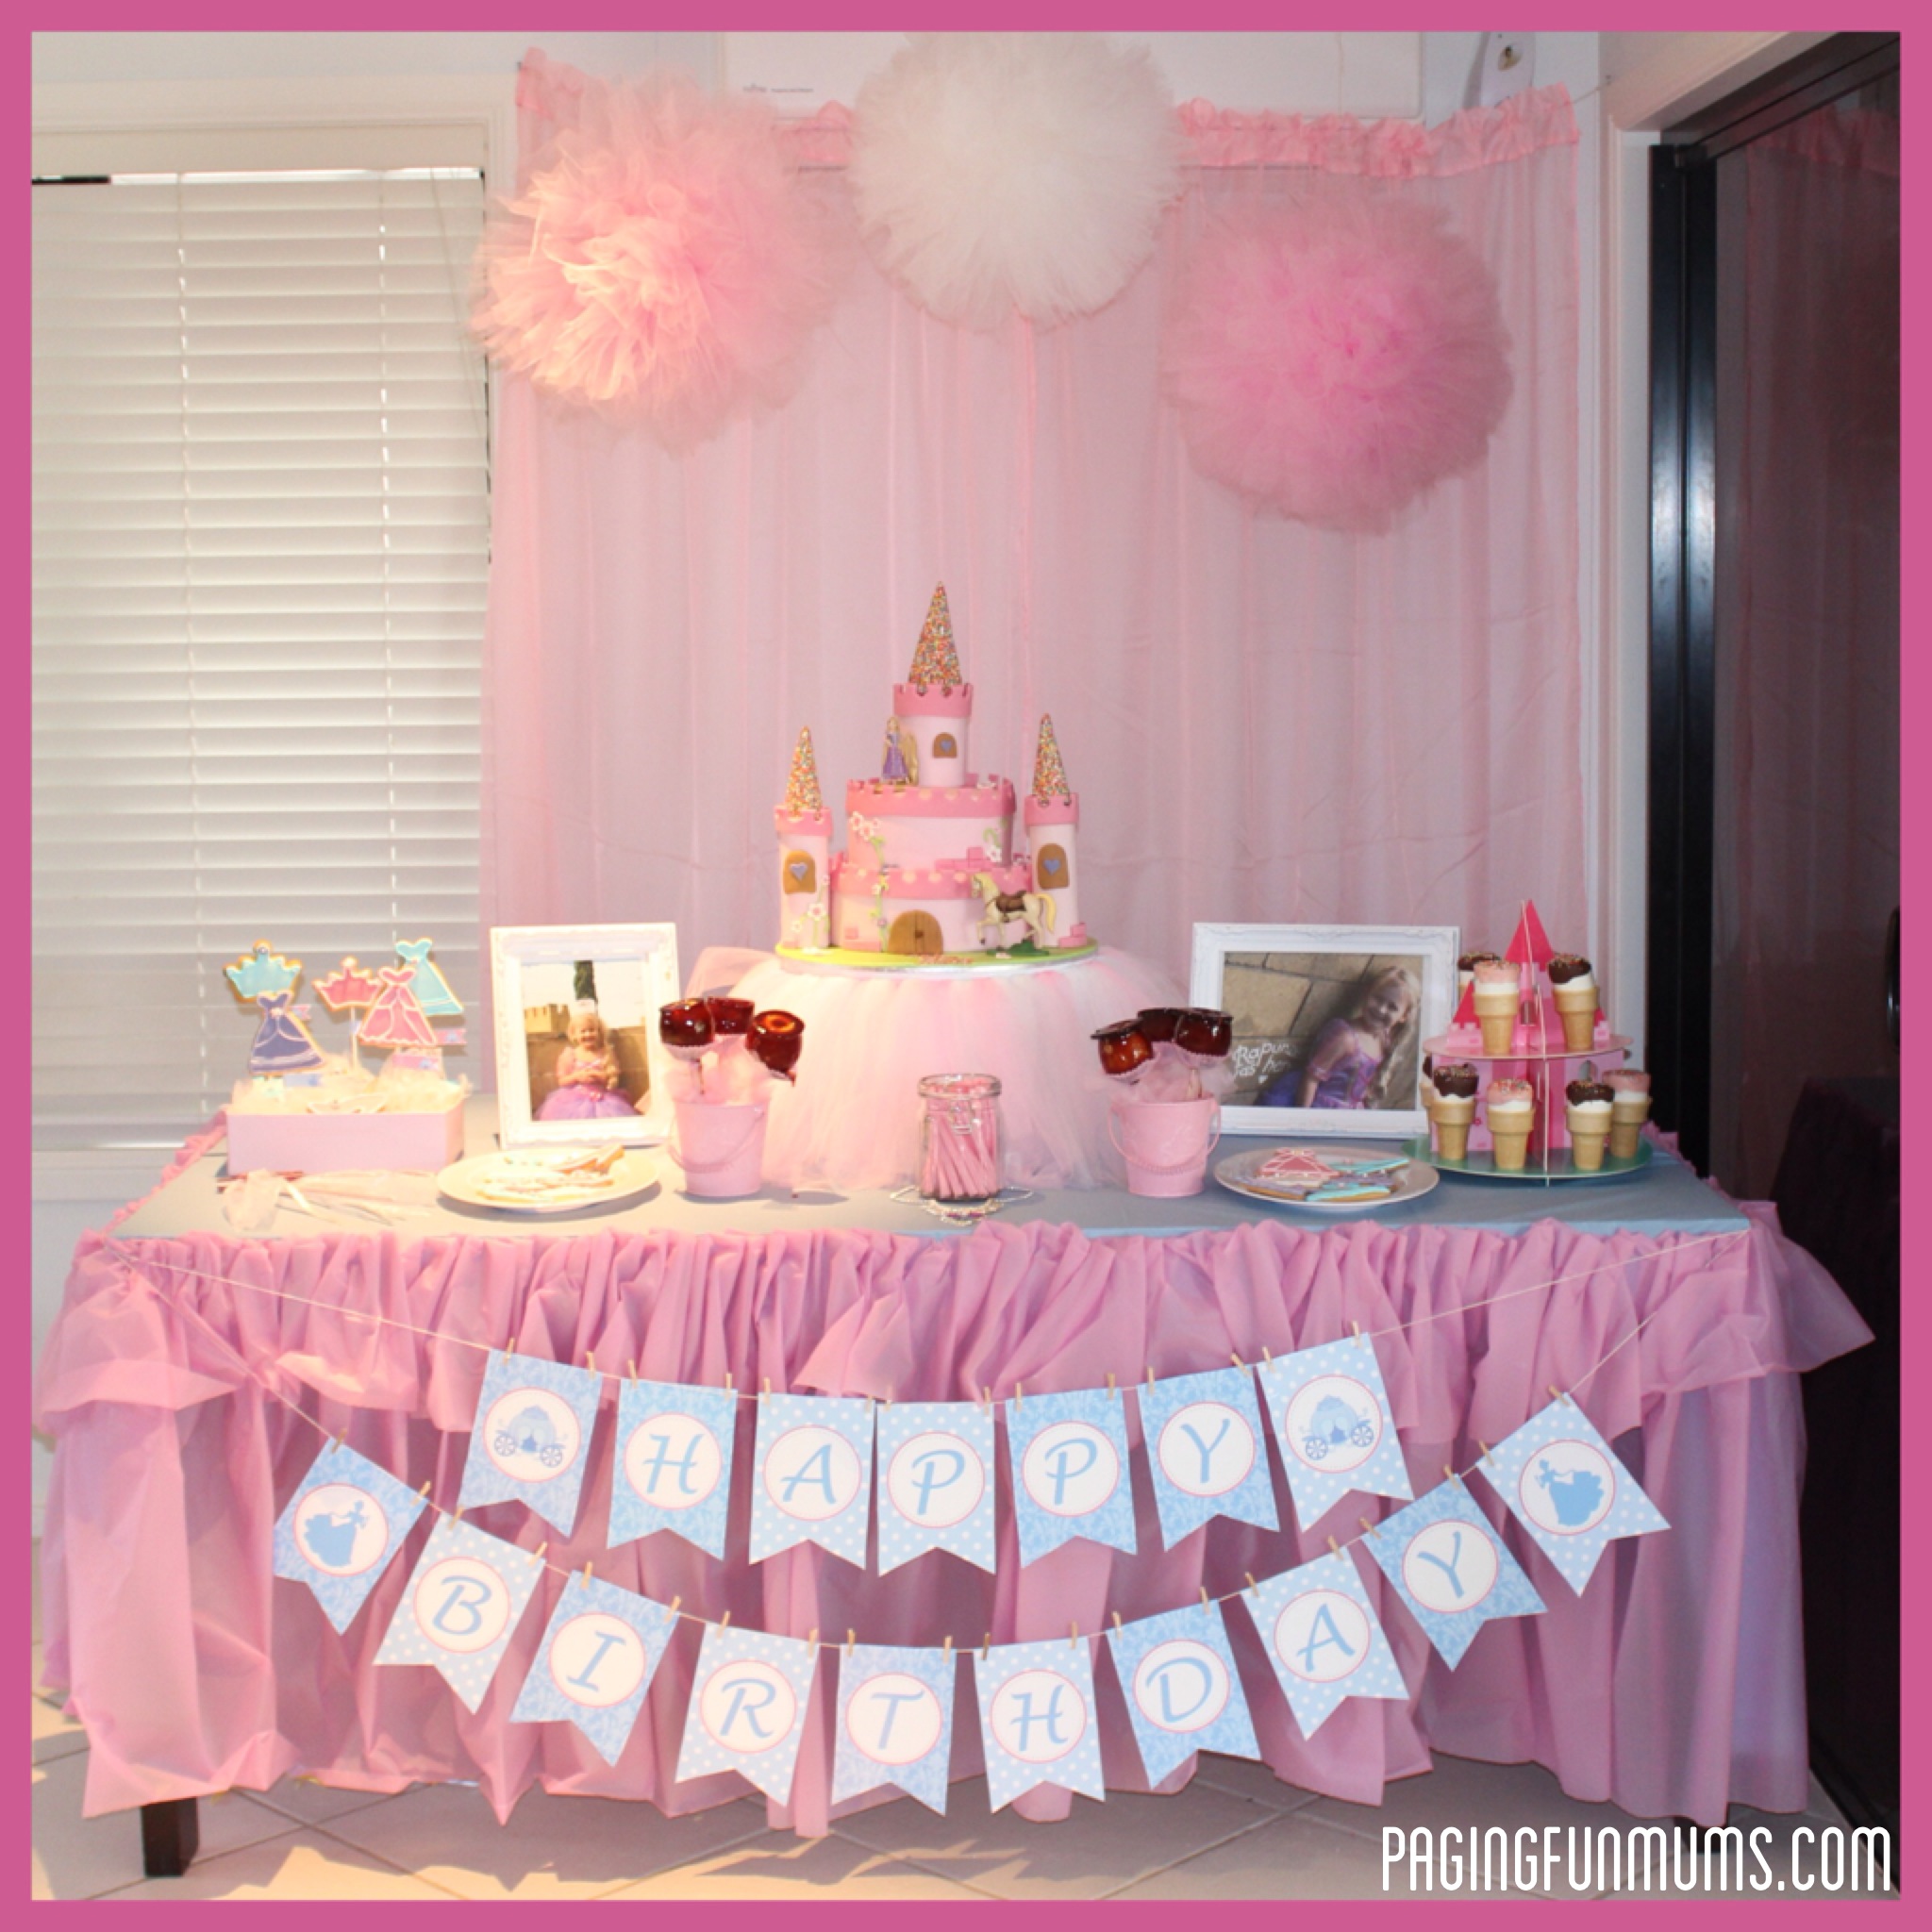
Once the cake was completed we placed it onto our DIY Tulle Cake Stand – you can see how to make that here – http://wp.me/p2Uher-2nW
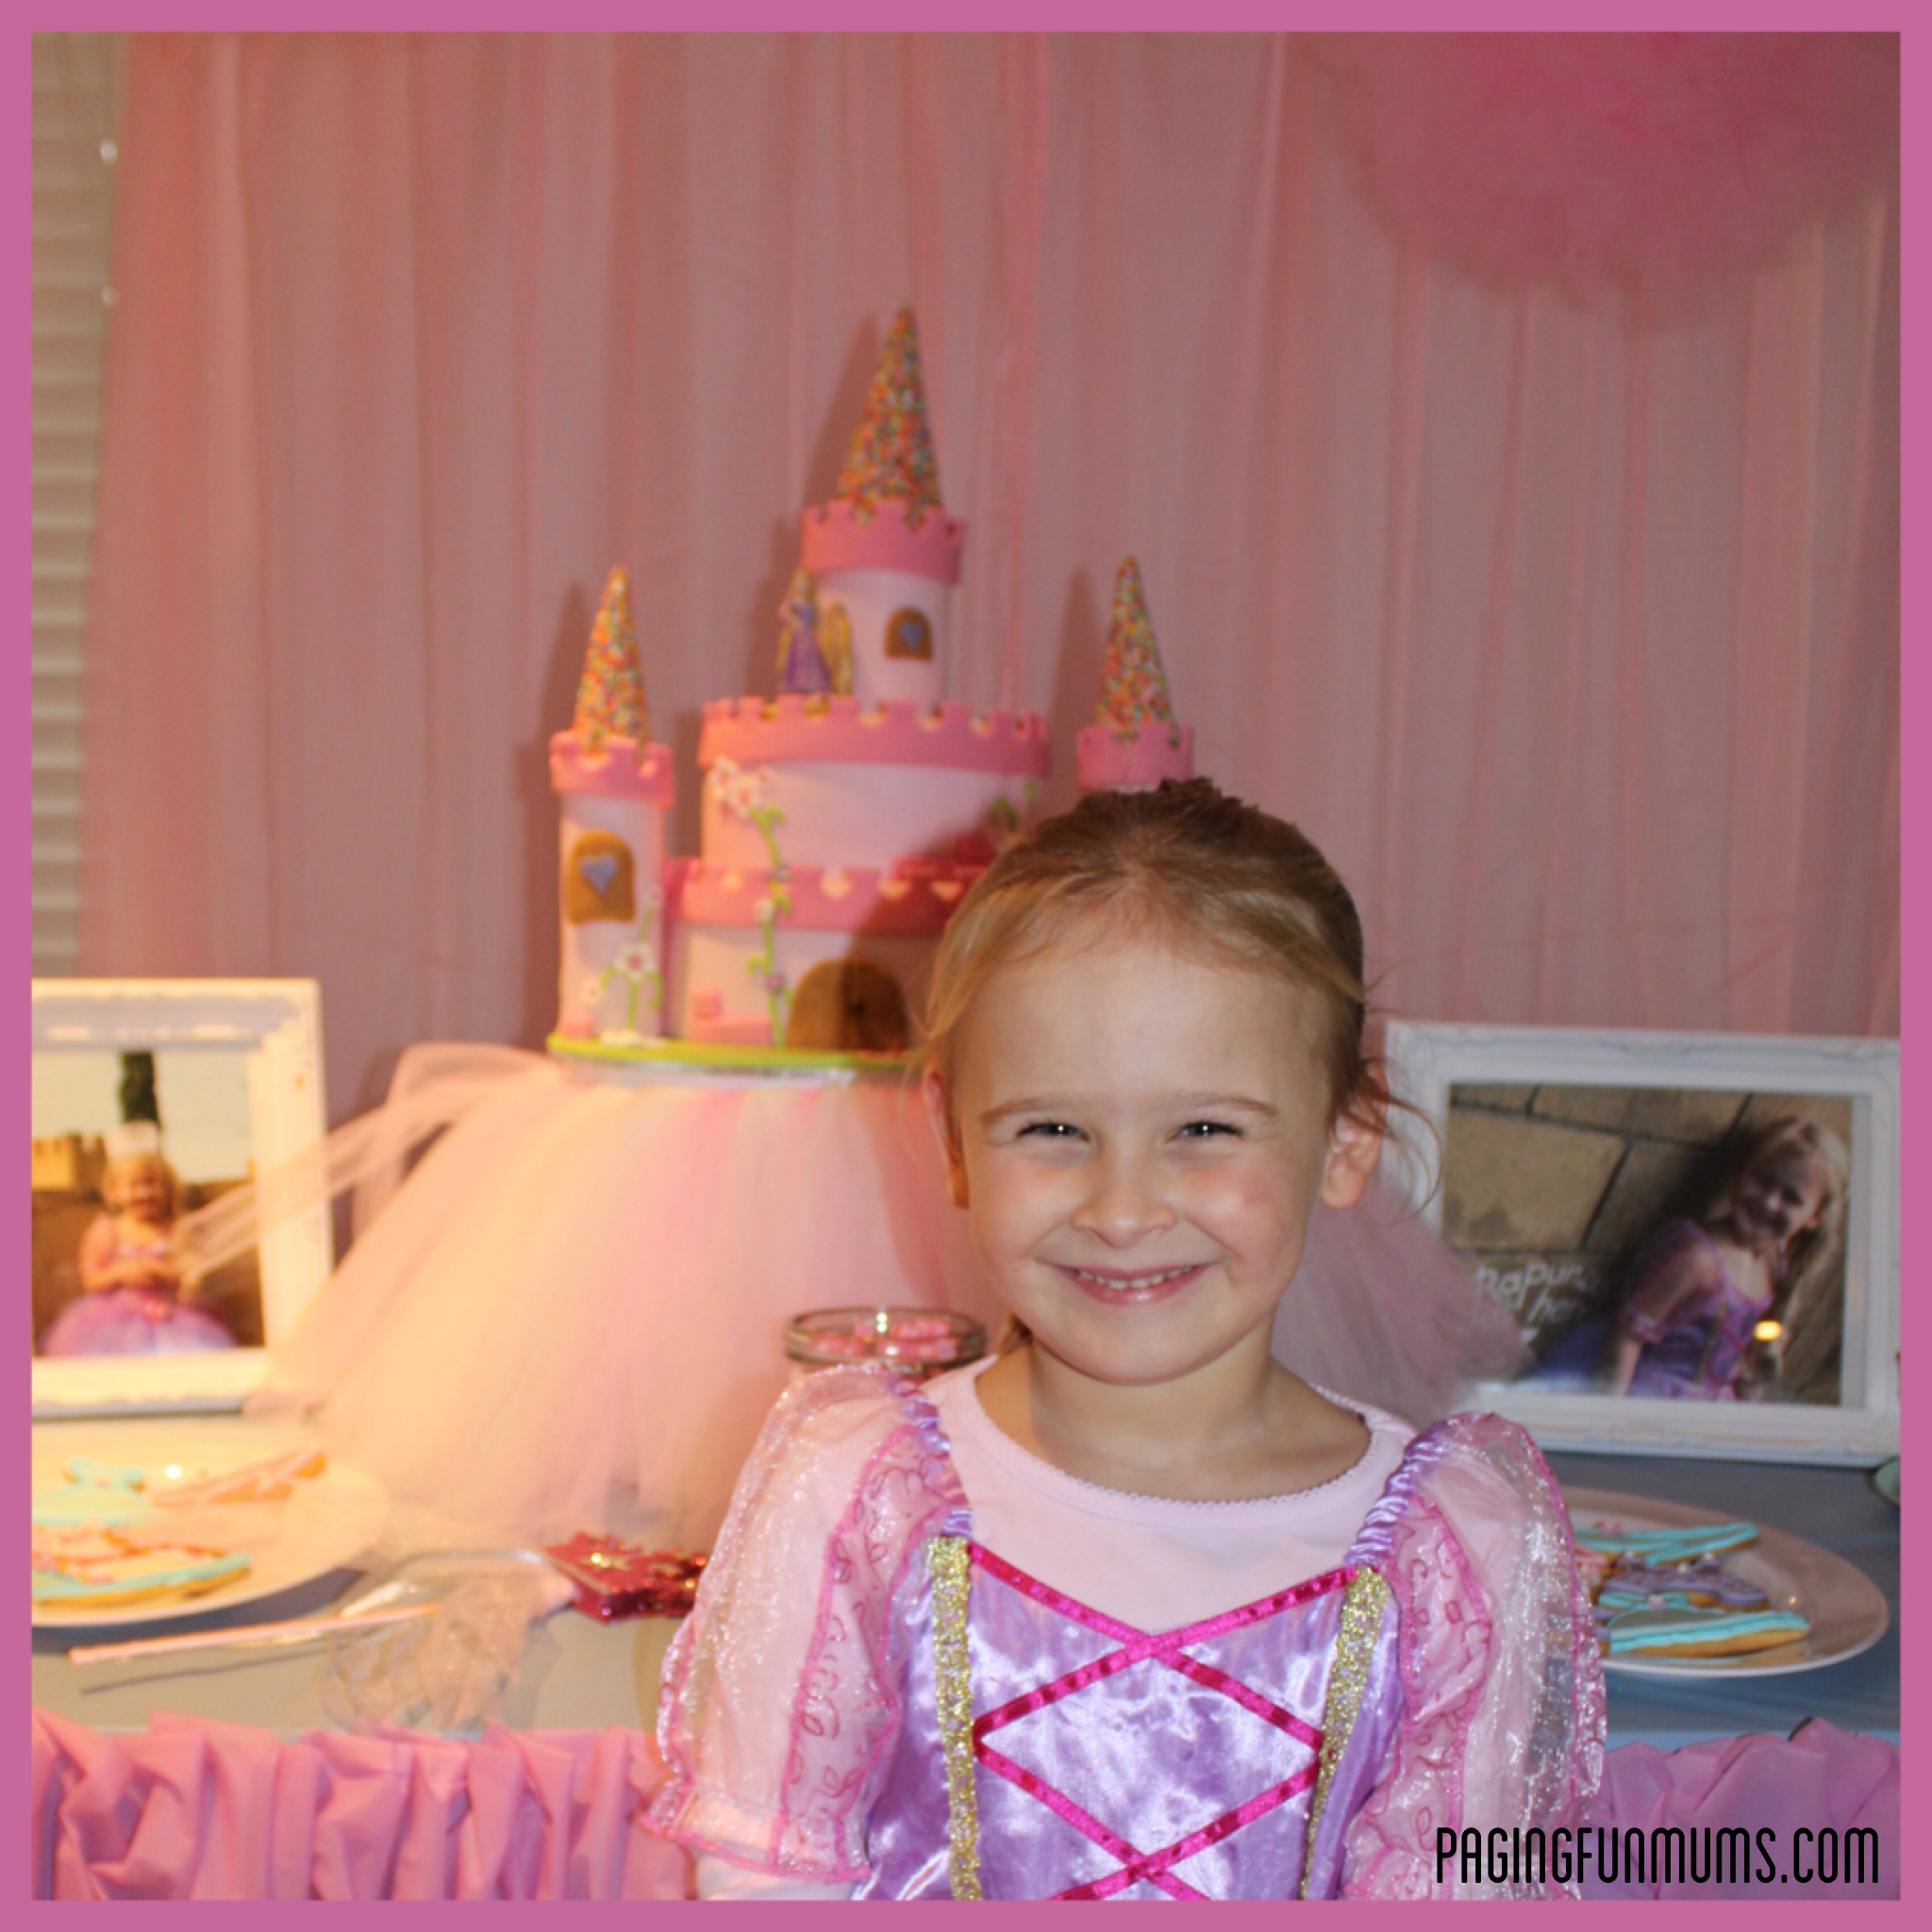
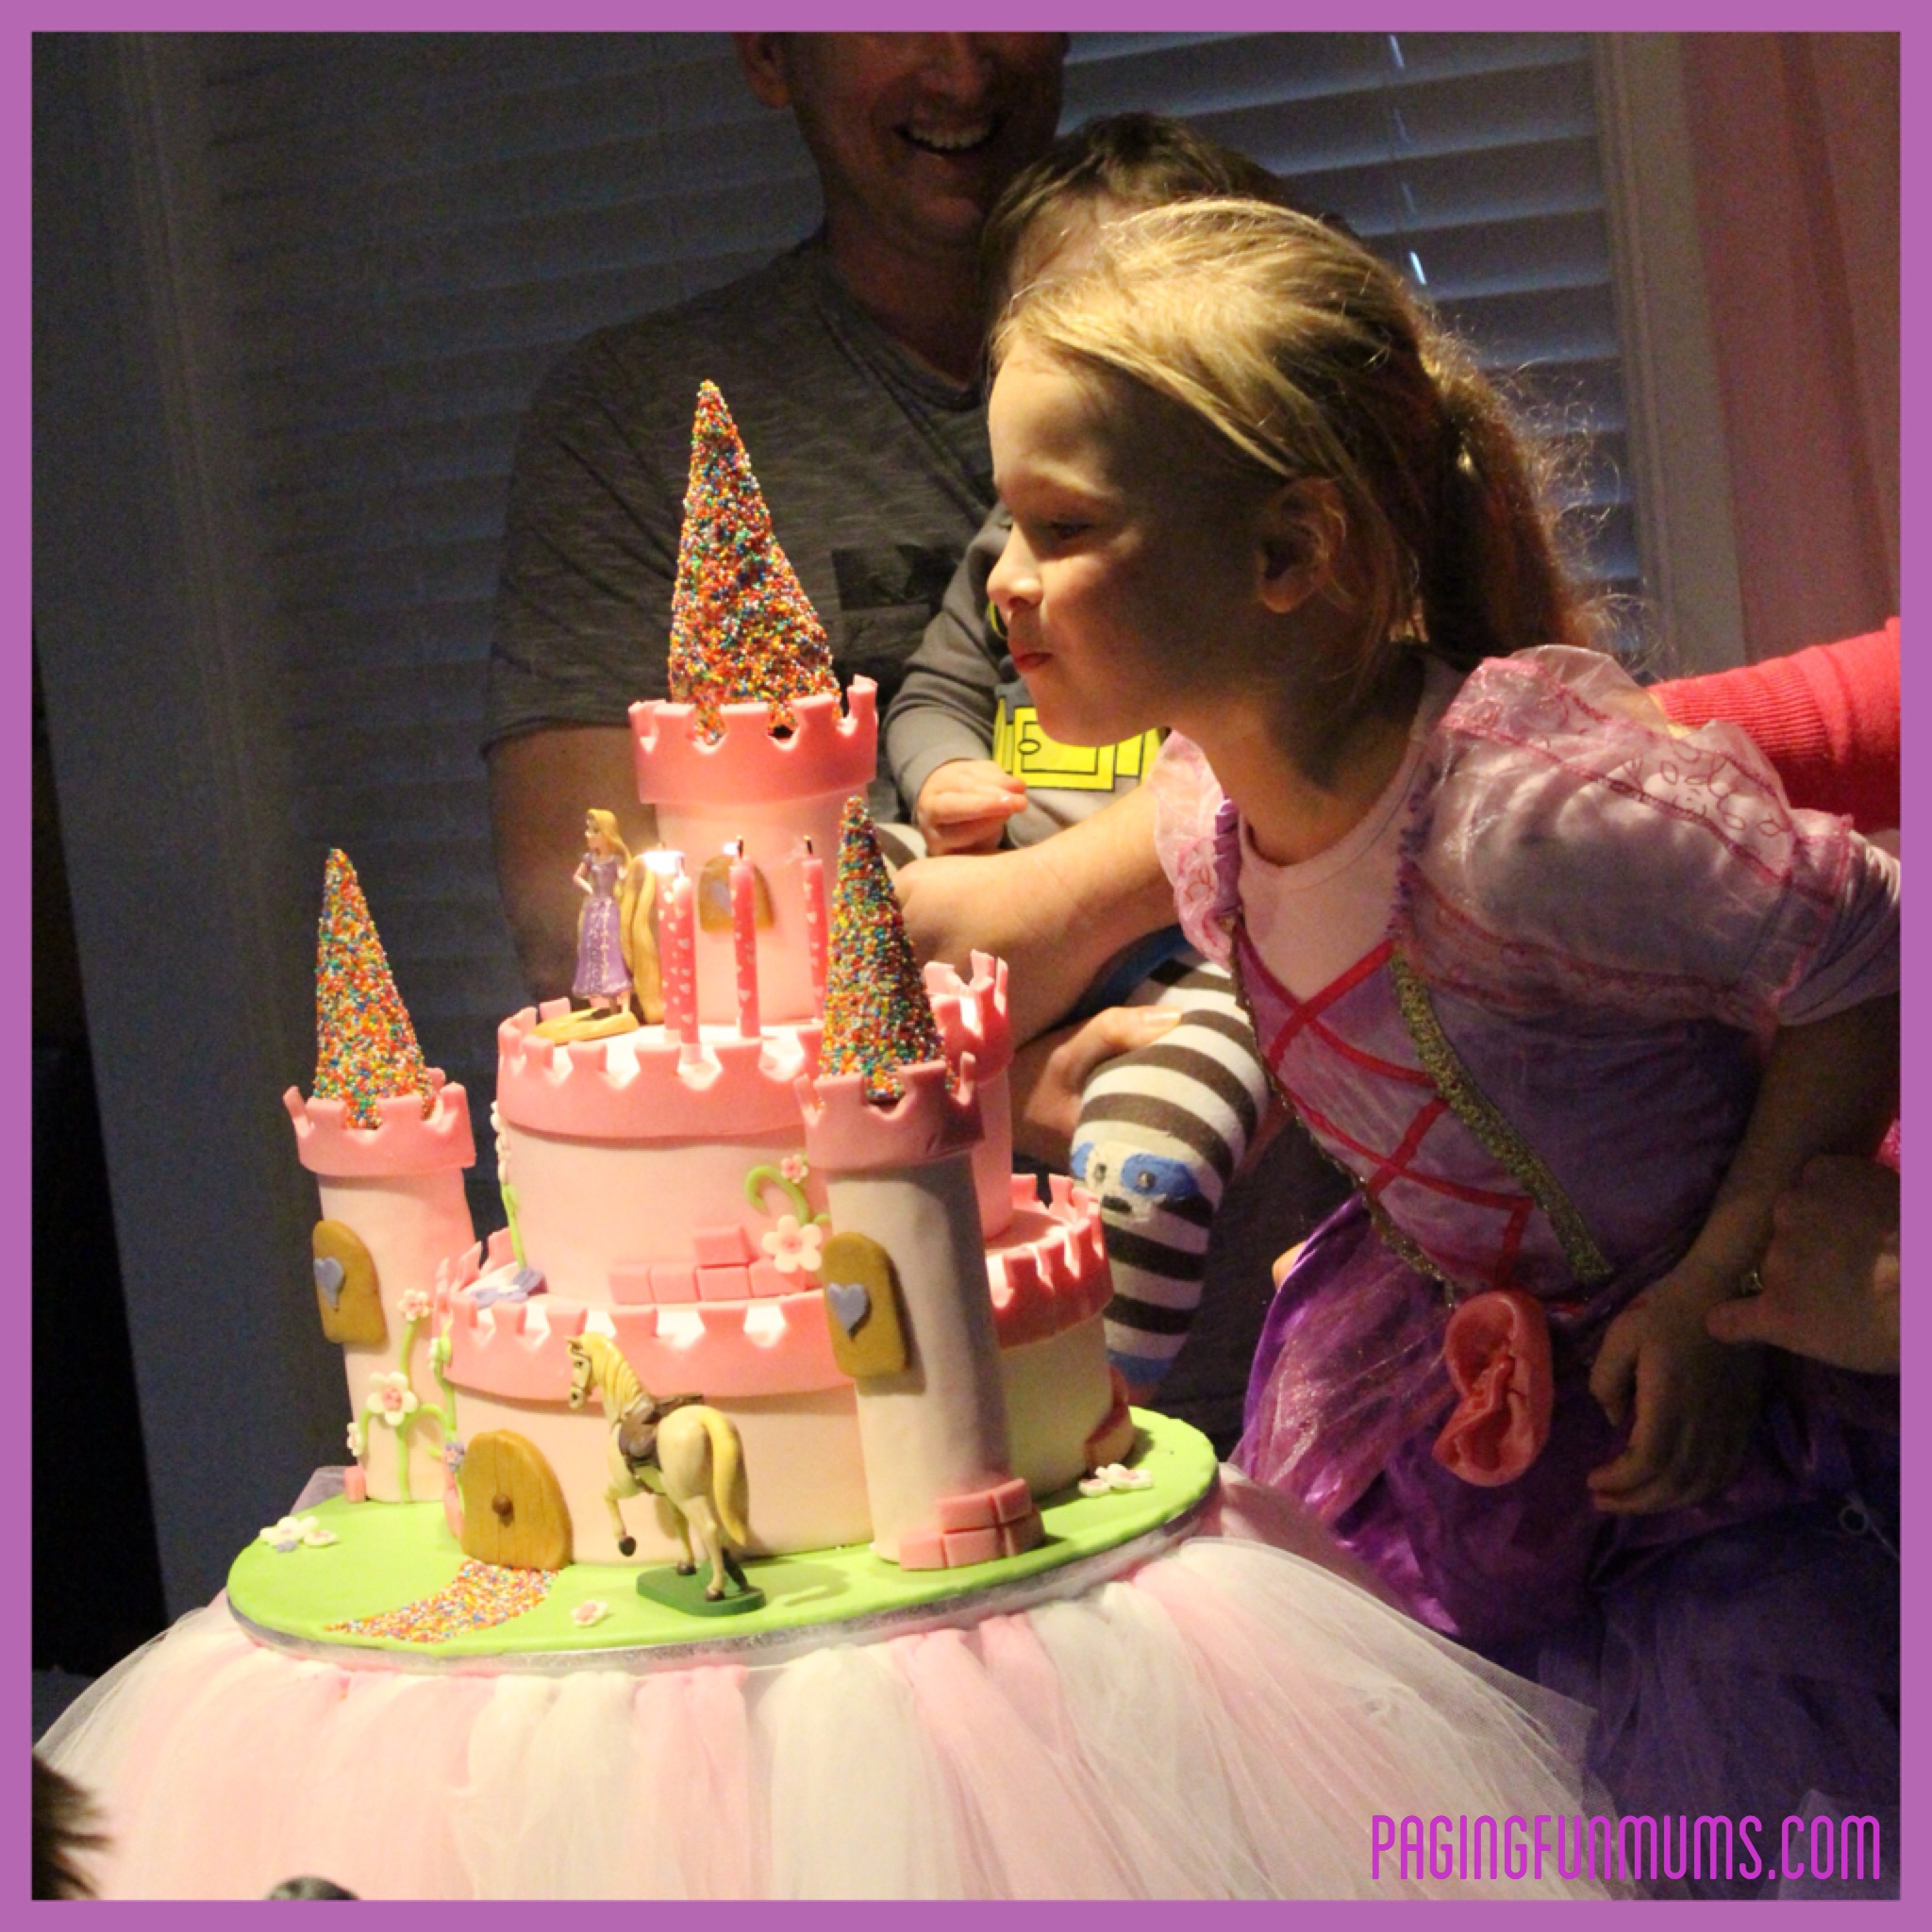
I have loved making all my previous cakes but I fell in love with this one – it was HARD to come to terms with slicing it up ;).
It was great to see how much the kids enjoyed watching me dissemble it though – and they loved eating the Krispy Treat towers almost as much as the cake!
I’m looking forward to the next ‘Cake Challenge’ my daughter or son throw at me ;).
Louise x
If you liked this tutorial you may also like our:


very impressive! I see in the photo that you made the ice-cream cone cakes. can you share your secrets, I was going to attempt these for jades b’day..lol.
Amanda – I will post the Ice Cream Cups tomorrow night ;). I’m just waiting to make sure the Marshmallow’s are available first :). x
Hey! This a great cake and it looks really easy to do! I love your detailed description of how you did it. What size cakes did you use and what size was the pvc piping that you used? Thanks
Hi Erin, so sorry for the late reply. We used a 10″ and a 7″ cake. The tubes were around 5″ and 3″ in diameter. Hope that helps.
Louise x
Hi Louise,
Can you tell me the heights of the tubes please? I am off to buy them today if possible and want to make sure I get the right height.
Thanks
Celia
Love the castle cake. I will
L be making it for my twin granddaughters this week for their 6th birthday. Can you tell me what size pans you used? Hope mine looks half as good as yours. Thanks for the step by step instructions and pics.
Linda
So sorry for the late reply – we used a 10″ and a 7″.
Louise x
Gorgeous, would love the recipe for the towers please.
Thanks,
This is a wonderful idea its my first time working with fondant so it should be interesting scary and exciting at the same time thank you for the diff pics and the rice crispy idea offers a whole new idea to cake I love it.
Hi how much crispy cake mix did you use.
I made a double batch of the standard recipe. Thanks Louise x
I am going to make this amazing cake for a friend’s daughter. Just wondering about the top tier of the castle. Did you use a rice krispie tower or more cake? Thank you
Jennifer
Hi Jennifer, It was a Rice Krispy tower – you could use either without a problem :). My kids love to eat Rice Krispy Treats so it was very popular lol :). Louise x
Thank you!!
Hi, the cake looks amazing! Am going to attempt this for my daughters birthday – am I right in thinking you put butter icing on first before you covered with the pink icing? I normally just cover my cakes straight away with regal icing – just wondering if it made a difference?
Thanks!
Gill
Hi Gill, I do use butter icing first – I find it makes it easier to smooth out any bumps etc that might be on the exterior of the cake itself. If you get good results using your method I would stick with that :).
Have fun! And feel free to send us through some pictures when you’re finished!
Louise x
Hi Louise,
Thanks for getting back to me – I’m going to try your method as I struggle at times to get the icing really smooth! Am contemplating a practice run next week!! I suppose if all fails Sainsburys do a princess cake!!
Gill
Thanks so much for this easy step by step guide… Couldn’t get hold of American marshmallows on short notice so I hope the regular kind work… You can really see that extra sugar when they are melting… Hopefully they set ok…
Thanks again. I almost died when my almost 4 yr old told me she wanted a castle cake with 6 days notice…
How did you go Casey? We would love to see a photo? Maybe you might like to share one on our Facebook Wall? Louise x
Loved the instructions! Have a baby girl fixing to turn one,another fixing to turn 3, one fixing to turn 10 & another soon to turn 14! May have to try this. I can’t get to the recipe for your rice crispies treat. & I’ve never heard of American marshmallows. Is this the jet puffed or just any kind?
Hi Wendy, so glad you like the cake! Here’s a link to how I link to make the Rice Krispy Treat- http://pagingfunmums.com/2013/04/04/party-food-louise/ . The USA Marshmallows are WAY better and not as sweet as the Aussie ones ;). You can find them at Costco if you have one handy? Or online. They don’t need to be Jet Puffed – I’ve tried a few brands and they were all great. Louise x
I absolutely love this idea for a princess cake!! My baby is turning 3 years old and i am going to attempt this for her upcoming party. I am happy that yo gave step by step instructions as i am not an avid baker… you made it seem simple enough! thank you
I like your Rice Krispies trick. I have a castle cake mold and was thinking of making it out of Rice Krispies in order to stand it up. Do you think I could use the same technique with the greased paper and leaving it over night?
Yep, that should work :). Louise x
Thanks so much for your step step instructions I made it for my daughters third birthday. Turned out so muh better than expected was my first time working with fondant 🙂
Hi Melissa, That’s so great to hear! Happy 3rd Birthday to your daughter!! Louise x
I love this tutorial! I am planning on making a Frozen castle cake in a few weeks for my daughter who will be 4. Any ideas for colors or things to do different would be appreciated. I will be using this as a guide.
Hi.
Your tutorial was excellent, I found this very helpful when making this cake/design for my daughters 4th birthday yesterday.
Although I tried chocolate covered rice crispies instead and it didn’t work so went to the shops and cheated a little (this was night before party) and bought Swiss rolls, but over all I was very impressed, and so was my daughter and family, def was horrible cutting it up. This was the first cake like this I have ever done, would has posted a pic if it had let me.
Thanks
Hello. I have a Beauty and the Beast cake to do this weekend. I am curious where you got the “crown cookie cutter to evenly space out the ‘cut-out’ sections of the tops of the castle”???
Thank you…AND…beautiful work!! 🙂
Hi Monica, Here is where I ordered mine from :). http://bakingpleasures.com.au/p5147/crown-pink-resin-cookie-cutter
Awesome cake, I’m inspired to make it for my daughter’s first birthday. Do you put the second tier directly on top of the bottom tier or is there some trick? I’d be worried the weight of the top tier would be too much for the bottom one? I’ve never made a two tier cake before…
Hi Robyn,
I usually cut some wooden dowel (from a cake decorating store) and insert 4 to take the weight of the top cake. You place the top cake on a thin cardboard cake base. I hope that helps! Louise x
Thank you. Will look into that.
Can you prepare it ahead of time and freeze it all separately or is it better to be made the day or so before serving? We have to travel 2 hours to my in-laws for my daughter’s birthday party so ideally I want to try and construct it the day before or morning of her birthday.
hi, just wondering how big the cake boards were? Thanks!
Thank you so much for sharing this cake – I made this for my 4 year old’s birthday and she saw it this morning – I can’t tell you how excited and happy she was. I used Playmobil Princess and additional bits (unicorn, bird bath, flowers) and it all looked wonderful. It was worth the battle trying to get the Rice Krispie treats into the beakers I had without getting my hands stuck in there too! Thank you!!!
Hi Rae,
I’m so happy to hear this! We would love to see a photo – perhaps message us one on Facebook if you can? Louise x
Hello, was just wondering if I could use regular icing instead of fondant, my daughter doesn’t like it? Beautiful cake by the way! Thanks!
Hi Jessica, you could use regular icing for sure :).
Lou x
Thank you so much!
Very lovely cake! FYI when attaching fondant to the board, you can just brush on some water with a pastry brush. Then if you make a mistake you can easily take it off and try again, instead of getting jam in it. It sticks just as well.
Hello, I am wondering did you make your own fondant or you purchase pre-made? If you make it, would you mind sharing recipe? Thank you, Billie
Hi Billie, I purchase mine online and get it delivered (found that to be the cheapest way). I have seen some Marshmallow Fondant recipes but have yet to try them out. Lou x
Hi there,
I love your cake and am going to attempt it for my daughter’s 4th birthday in a few weeks.
Can you tell me what size cake you ordered for the 2 tiers please?
Many thanks,
Celia
Sorry Louise – I didn’t see your earlier post about the sizes until now. I can see you used a 10″ and a 7″ cake tin. Thanks
Hi again,
Do you have photo of the back that you can post so I can see what sort of decorations you did please?
(You can tell that I am trying to get fully prepared before taking on the challenge of making the cake!)
: )
Hi Louise,
Can you tell me the height of the plastic tube towers to buy as I am aiming to go and get them today.
Many thanks
Celia
hi Luise, thanks for teh inspiration! It looks like I’ll need to whip up a boy’s knight castle this year, as my soon 4-yr old has already made up his mind 🙂 Love the details on the top of the towers!
Sounds like a FUN cake project! So glad you found us. Good luck and have FUN! Lou x
I am about to attempt this wonderful looking cake! How high are the 3″ and 5″ towers?
Really cute cake thank you for posting it. I would like to know what you used as grease proof paper?
Thanks Joy
how inspirational and I love the ingenious tower tops and idea to make the towers themselves – I’ll bet the kids totally had a ball and will remember that cake 😉
Tania Fasher
Thanks for your inspiration., I managed to make one for my daughter 4th birthday a few weeks ago. I was going to upload some pics but can’t seem to find how to do that on this feedback section!
Thanks again for your detailed instructions – they really helped!
Celia
Thanks sweet mum, I’d like to know the height of the pvc piping & the height of each tier of the cake, thank you
Hi love your cake gonna make this for my little girl what size is the cake board did you use please ? X
I was curious what your recipe was for the powdered royal icing that you uses on the ice cream cones?
It looks much easier for coating them in sprinkles. I am doing a castle cake for my daughter’s birthday this weekend. Thanks so much for your post.
Gorgeous cake! I’ve started thinking ahead to my daughter’s 6th birthday in a few months and I think this will be a winner! After staring at the pictures for a while, though, and reading the comments, the sizes just weren’t making sense to me (there is definitely more than a 2″ difference between the second tier and the top tower) so I used a piece of paper to make a measurement scale. Assuming the bottom tier is indeed 10″, then the second tier is 8″, the two side towers are 2.5″ diameter by 6″ tall, and the top tower is 3.5″ diameter by 4.5″ tall (and the bright pink ribbon around the top of each is 1.5″ wide, the smaller cones are 2″ diameter, the large cone is 3″ diameter, and the cake tiers are each 3.5″ tall). Since the fondant and frosting were included in my baseline measurement of the bottom tier, these numbers should be close to actual pre-frosting sizes – at least for the cakes, but maybe subtract a smidge from the tower sizes to account for the greater ratio of frosting). Do I have too much time on my hands? Possibly – but then so does anyone who is considering making this cake! I’m thinking I will use tin cans for the tower molds; without having brought a ruler to the store yet, I’m thinking an asparagus can might fit the bill for the side towers and a 28oz can of baked beans for the top tower.
I hope this helps someone!